Ready to crack open the black box of your app’s network traffic? This Proxyman Tutorial is your golden ticket to becoming an HTTP/HTTPS debugging wizard! Proxyman, the macOS powerhouse, lets you intercept, inspect, and manipulate requests from browsers, iOS, Android, and beyond.
Whether you’re sleuthing API bugs, mocking server responses, or testing mobile apps, this guide will walk you through Proxyman’s superpowers with a grin. Grab your digital magnifying glass, testers, and devs—let’s dive into this Proxyman Tutorial and make network debugging your new playground!
What is ProxyMan exactly?
Proxyman is a high-performance macOS app that allows developers to view HTTP/HTTPS requests from apps and domains, including iOS devices, iOS Simulators, and Android devices.
At its core, ProxyMan is a proxy server. "Proxy" is just a fancy word for "middleman". When your application (be it a browser, a mobile app, or even a desktop program) needs to talk to the internet, instead of going directly, it sends its requests to ProxyMan.
ProxyMan then forwards that request to the internet destination, receives the response, and sends it back to your application.
1. Features
- Intercept HTTP/HTTPS (SSL) requests from your MacBook, iOS Simulators, iOS devices, and Android devices.
- Support Apple M1/M2/M3 Chip and macOS Ventura & Sonoma
- 100% written in Apple Swift NIO for high-performance
- Modern and intuitive UI.
- Exclusively native, built for macOS. The Windows app is also available. Linux is coming soon.
- Comprehensive debugging tools: Compose, Repeat, ...
- Advanced Tools: Map Local, Map Remote, Breakpoint, Allow List, Block List, External Proxying, No Caching, Clear Cache, Protobuf, Scripting (Rewrite), and Diff.
- Provide a customizable workspace.
- Support macOS 11 or later.
2. Why is this revolutionary for testing?
That is because while ProxyMan is acting as the middleman, it can:
- Intercept: See every single piece of data going back and forth.
- Inspect: Examine the request and response in detail (headers, body, status codes, timings).
- Modify: Change the request before it goes to the server, or change the response before it goes back to the app.
- Mock: Serve local files or predefined responses instead of contacting the actual server.
Imagine the possibilities! You can see exactly what data your login screen sends, what response the server gives, how your "Add to Cart" button talks to the backend, or why that image isn't loading.
Besides, the ability to modify opens up a whole universe of testing scenarios you couldn't easily do before.
Why should ProxyMan (and Proxies in General) be in your testing toolkit?
- Debugging APIs: Instantly see if your frontend is sending the correct data or if the backend is returning what you expect. No more guessing!
- Testing Error Handling: Easily simulate network errors, server errors (like 500 Internal Server Error), or specific API error codes (like 401 Unauthorized, 404 Not Found) without requiring developers to manually break things for you.
- Frontend/Backend Contract Testing: Verify that the data format being sent and received matches the agreed-upon API contract.
- Performance insights (Basic): See the size of requests and responses, and get a rough idea of timings.
- Security peeking (Light): Spot potential vulnerabilities like sensitive data being sent in URLs or insecure headers (remember, this isn't a replacement for dedicated security tools, but it's a great starting point).
- Mobile app testing: Intercept traffic from native mobile apps, which is often much harder than web traffic.
- Mocking dependent services: Test your application's behavior when an external service it depends on is slow, down, or returns specific data, by serving mocked responses.
If your application talks over HTTP or HTTPS (which, let's be honest, most do!), Proxyman gives you X-ray vision and a manipulation superpower.
Get started with Proxyman tutorial: Setting up your digital post office
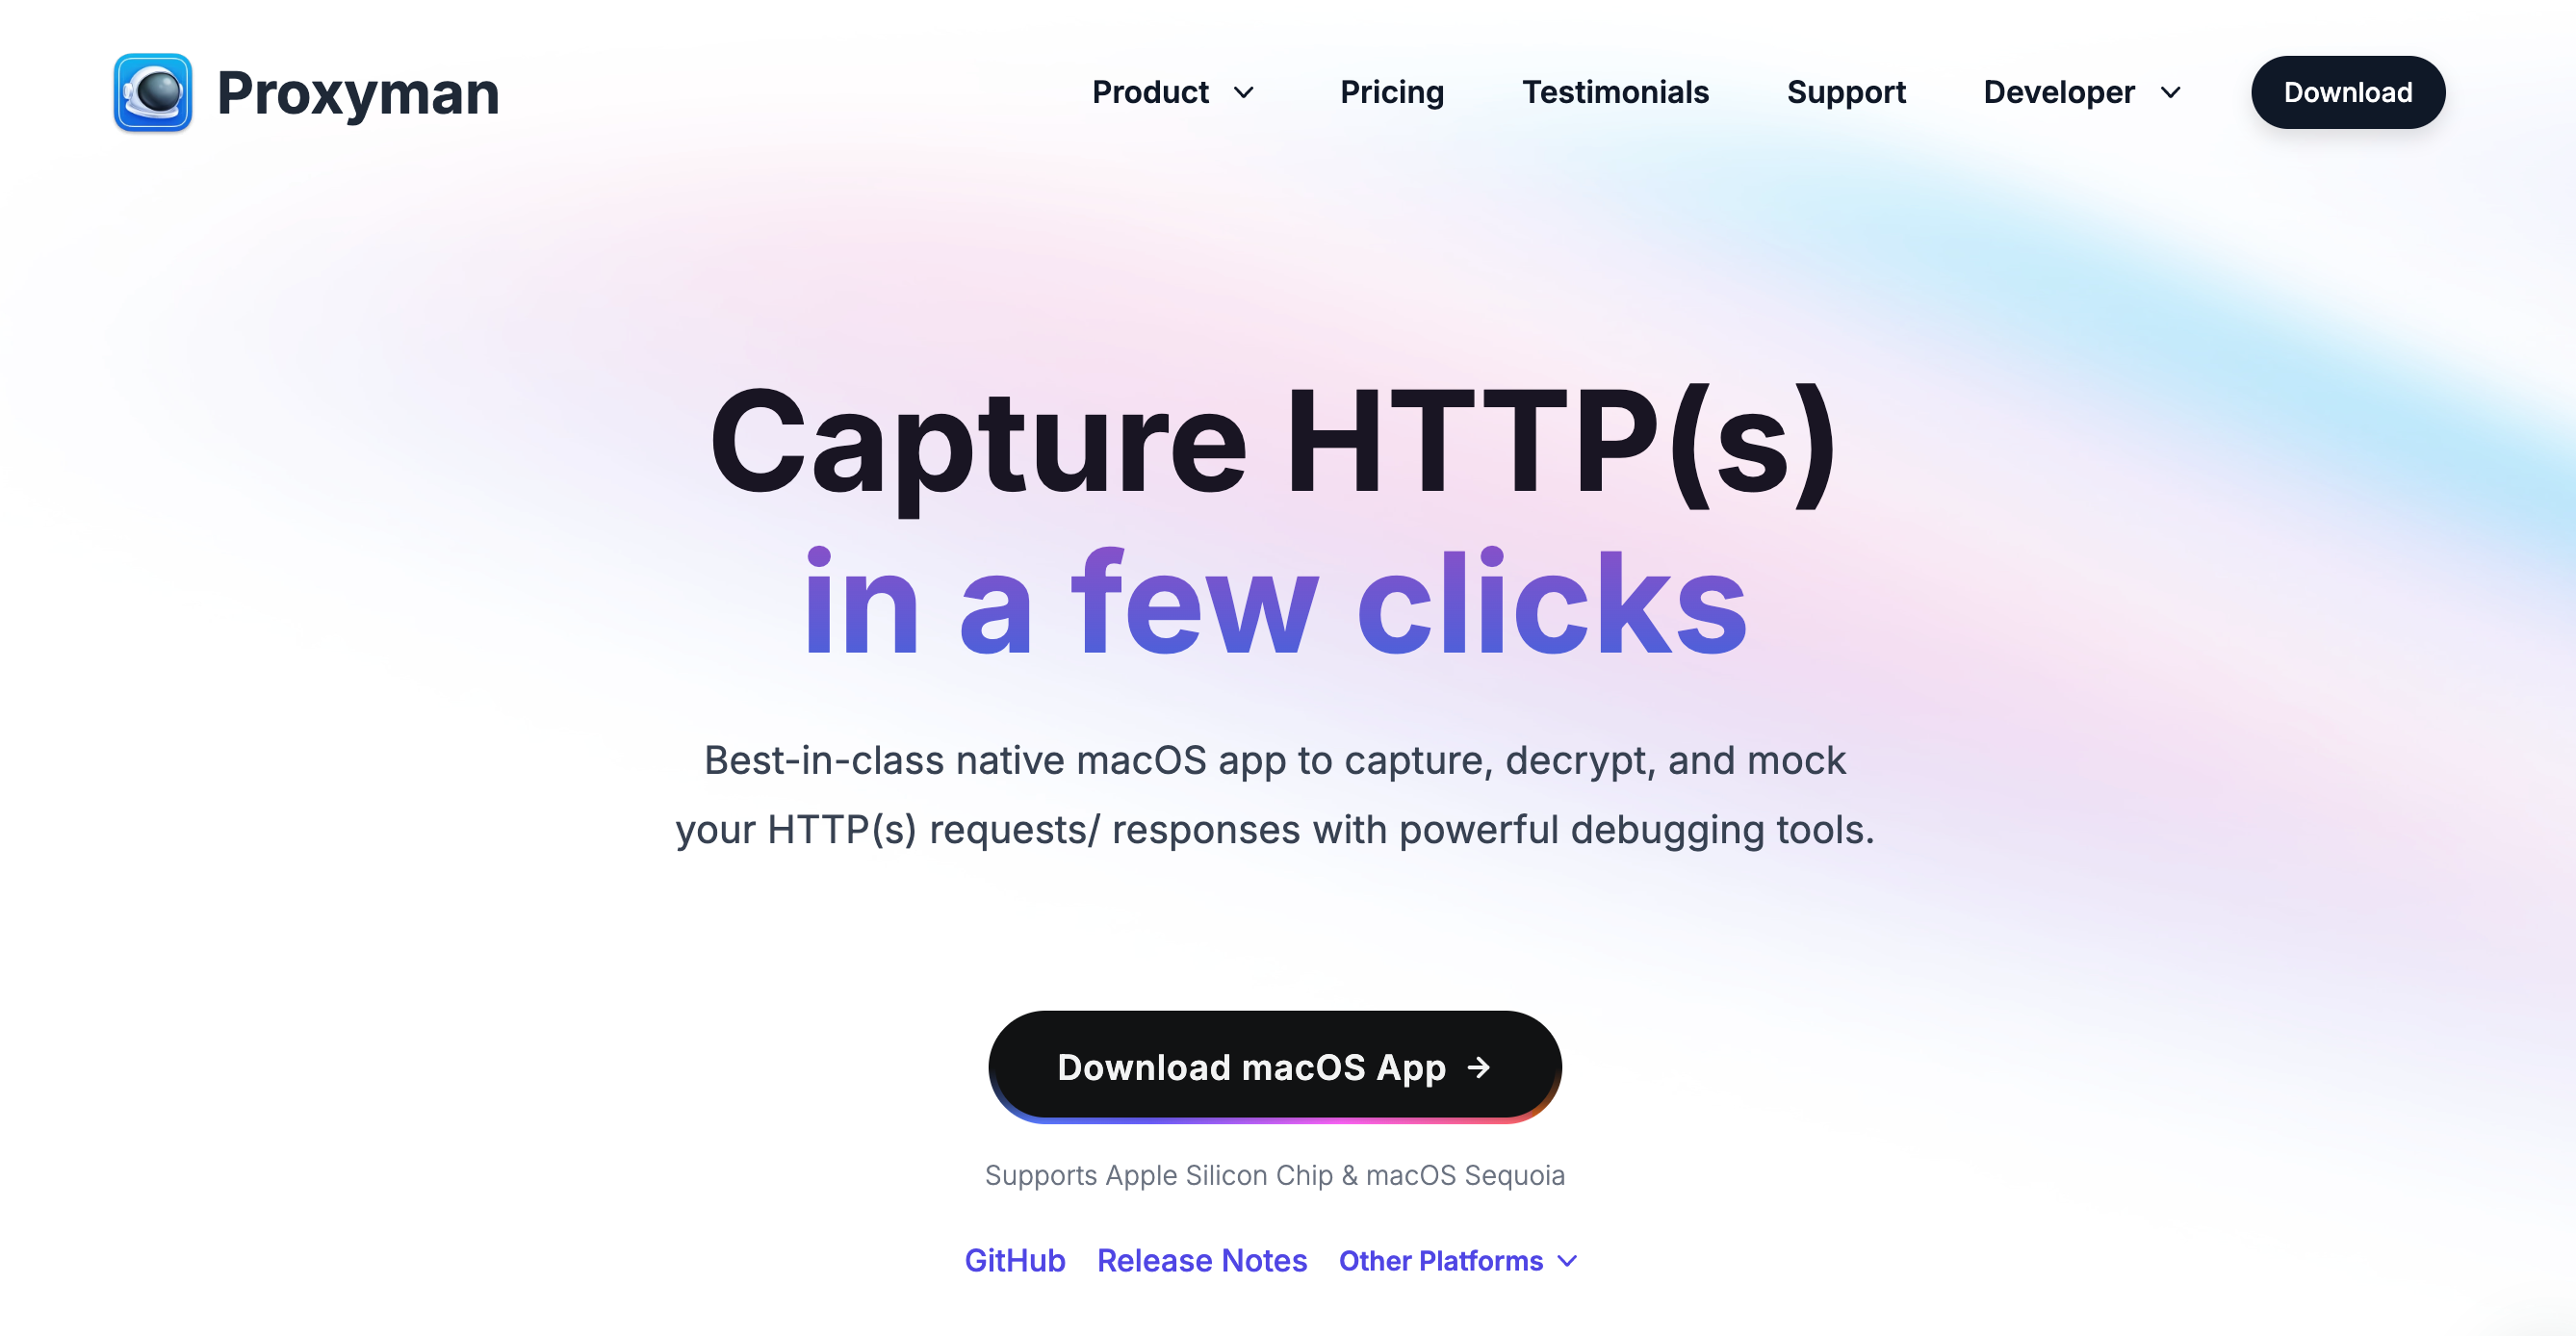
1. Download the app
Head over to the official ProxyMan website and download the compatible version for your operating system (Windows, macOS, and Linux are usually supported).
- Download the latest macOS app
- Download the latest Windows app
- Download the latest iOS app
- Download via Cask
$ brew install --cask proxyman
2. Launch ProxyMan
You'll be greeted by an interface that might look a little intimidating at first, but trust me, it's friendlier than it looks. You'll typically see panels for intercepted requests, details of a selected request/response, and various settings.
3. Proxyman tutorial to install Certificates (or Certifications)
To intercept encrypted HTTPS messages (Request or Response), you have to install the Proxyman CA Certificate on your current machine. This step is mandatory for iOS, Android devices, iOS simulators, Java VMs, and Firefox, too.
The Proxyman Certificate is a self-signed certificate that is generated on your machine. Proxyman never stores or transmits any personal data to Proxyman's server or 3rd-party.
Please check out the Privacy Statement to understand what Proxyman obtains or not.
If you'd like to manually generate a Certificate on your machine, you can add it to Proxyman. Please check out the Custom Certificate Doc.
Proxyman's certificate is stored locally at ~/Library/Application\ Support/com.proxyman.NSProxy/app-data/

3.1 Automatic mode (Recommended)
Proxyman could automatically install & trust the Certificate in Keychain by following the steps below:
- Open the Certificate menu
- Install a Certificate on this Mac...
- On the Automatic Mode -> Enter your Mac's password (Root Privileges)
- Verify the status: Installed & Trusted in the button (If not, try to use the Manual Tab, or contact us for further support)
- Done
In automatic mode, Proxyman will automatically perform two steps:
- Generate a local Proxyman Certificate at ~/Library/Application\ Support/com.proxyman.NSProxy/app-data/proxyman-ca.pem
- Install & Trust the certificate in System Keychain Access. It requires Root Privileges to execute the following CLI:
sudo security add-trusted-cert -d -r trustRoot -k /Library/Keychains/System.keychain ~/Library/Application\ Support/com.proxyman.NSProxy/app-data/proxyman-ca.pem

Automation mode requires Root Privileges to perform the installation script. If you're not sure, please consider using Manual mode.
3.2 Manual Mode (Advanced)
Proxyman also offers more freedom for super-users who need to install the certificate on their behalf.
- Open the Certificate menu
- Install a Certificate on this Mac... -> Select the Manual Tab
- Click on the Generate & Add button (Proxyman will locally generate the certificate and add it to Keychain, but not Trust it automatically, no Password required)
- In some cases, System Keychains will ask to select what keychain should be installed -> Select System Keychain
- Open the Keychain Access app on your Mac -> Search "Proxyman CA" -> Open -> Select "Always Trust" -> Quit Keychain and Save
If you've done it correctly, Proxyman will display " ✅ Installed and Trusted" status.

Suppose you are not sure how to trust the certificate on the Keychain Access app. You can open the Terminal app and execute the command:
sudo security add-trusted-cert -d -r trustRoot -k /Library/Keychains/System.keychain ~/Library/Application\ Support/com.proxyman.NSProxy/app-data/proxyman-ca.pem
Make sure that you Delete the Proxyman Certificate in the Keychain app if you're not using Proxyman anymore. If not, anyone who has the Proxyman Certificate can intercept your HTTP/HTTPS requests from your macOS machine.
3.3 Uninstall Proxyman Certificate
- Open Certificate Menu
- Reset all Certificates
- Enter your Mac password, and done
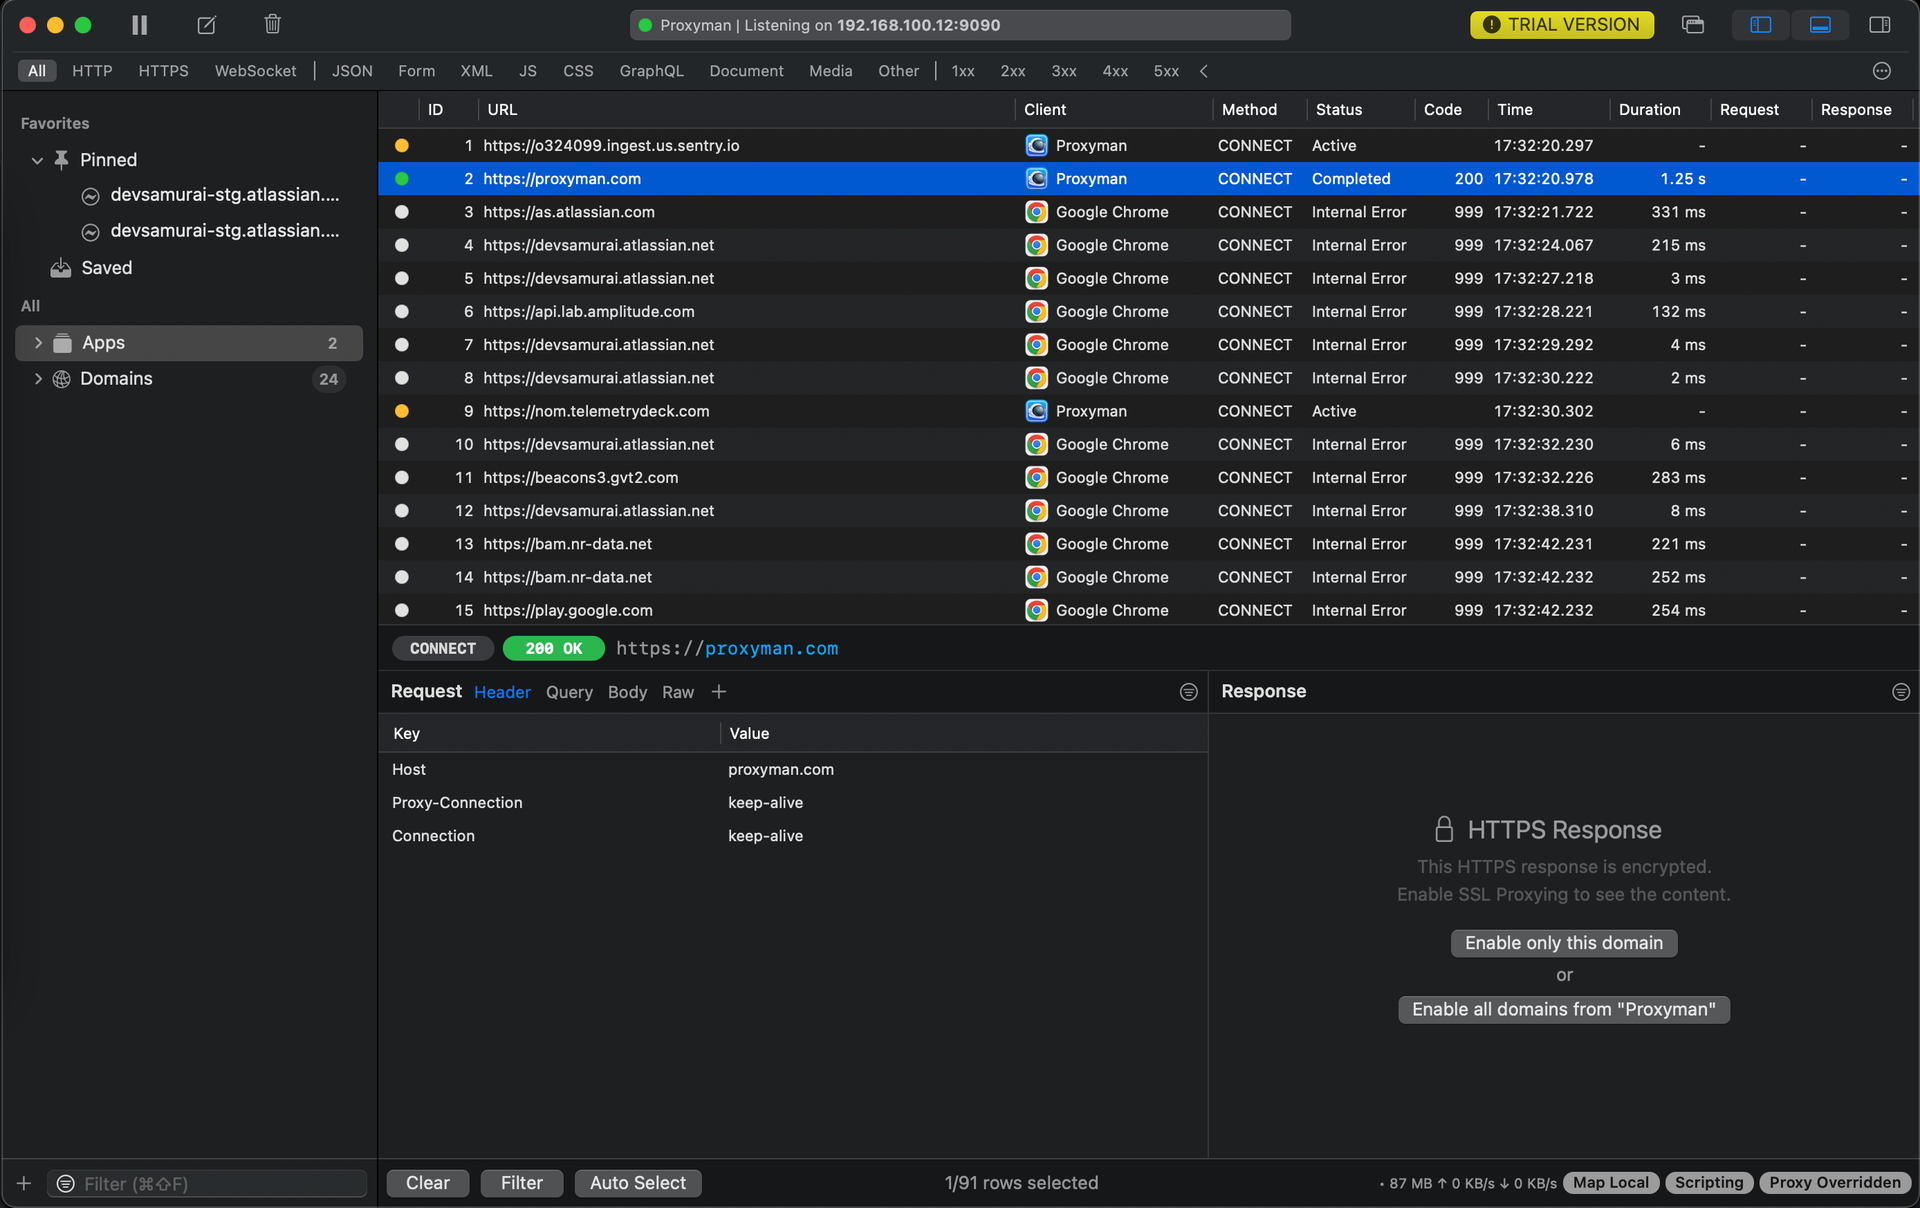
After successfully installing the certificate, you can now see the Network Requests information of the apps on your computer:

Becoming the Middleman - Configuring Your Device/App
This is the crucial step where you tell your application or device to send its traffic through this Proxyman tutorial.
1. Find Proxyman's address
Look in Proxyman's settings or status bar. It will tell you the IP Address and Port it's listening on. This is usually something like 192.168.100.12 (which means 'this computer') and a port number (like 9090). Note these down!

2. Configure your client
Now, tell your client (browser, mobile phone, etc.) to use Proxyman as its proxy server.
For Browsers (Easiest for web apps):
- Most browsers have proxy settings in their network configuration.
- Go to your browser's settings -> Network or Proxy settings.
- Choose "Manual proxy configuration."
- Enter the IP Address and Port you got from Proxyman for both HTTP and HTTPS proxies.
- Save the settings.
- Pro Tip: It is recommended to use tools like FoxyProxy to easily switch proxy configurations. ( FoxyProxy is available in the Chrome Web Store and the Firefox Add-ons site.)
- After adding → Open the details of FoxyProxy in Manage Extensions
- Turn on

- Click Extension options to open the settings of FoxyProxy
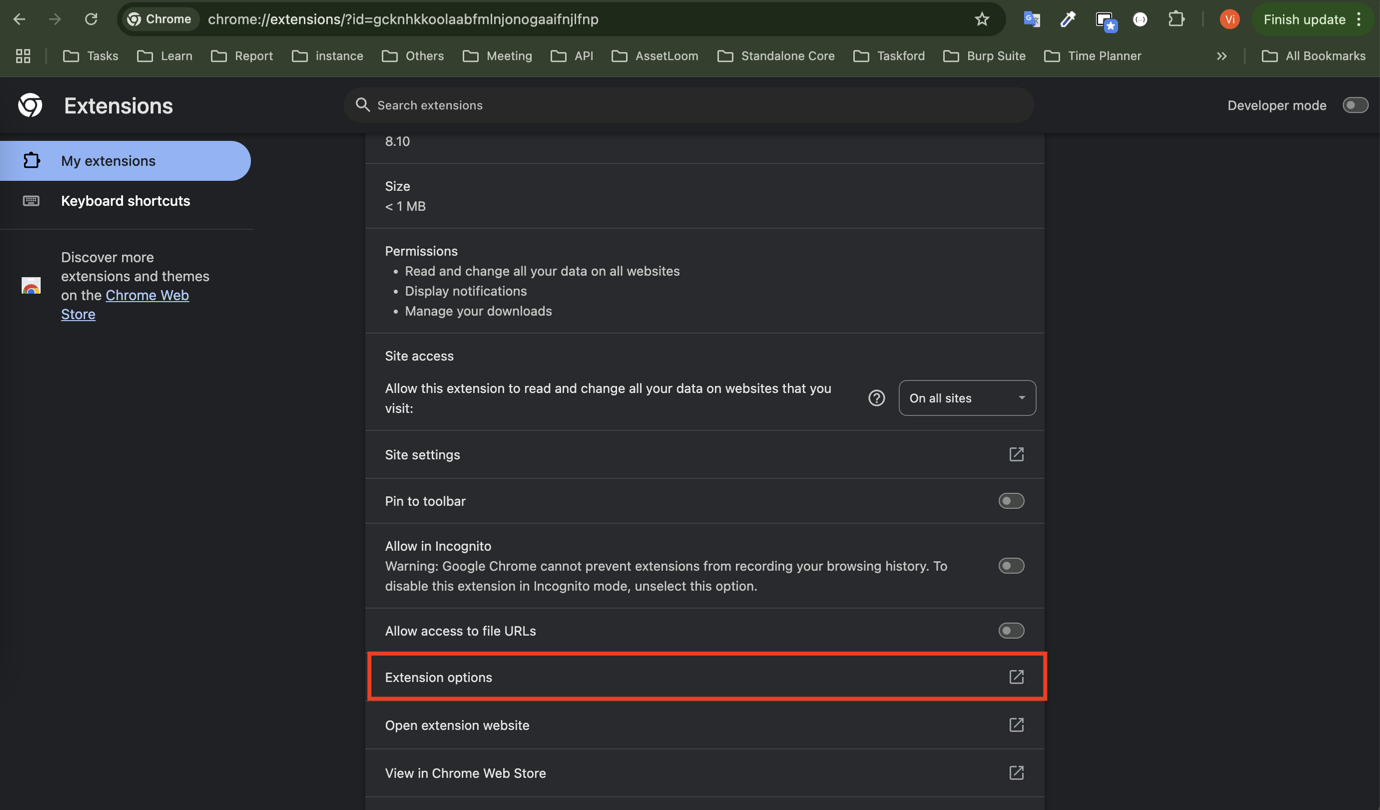
- Click Add → Enter the required information → Click Save

For System-wide traffic (Includes most apps):
- Windows: Go to Settings -> Network & Internet -> Proxy. Turn on "Use a proxy server" and enter the address and port.
- macOS: Go to System Settings -> Network -> (Select your active network interface, e.g., Wi-Fi) -> Details -> Proxies. Check "Web Proxy (HTTP)" and "Secure Web Proxy (HTTPS)" and enter the address and port.

Remember to turn this off when you're done testing, or your regular internet might not work!
For Mobile Devices (Crucial for Mobile App Testing):
This requires your mobile device and the computer running Proxyman to be on the same local network(connected to the same Wi-Fi router).
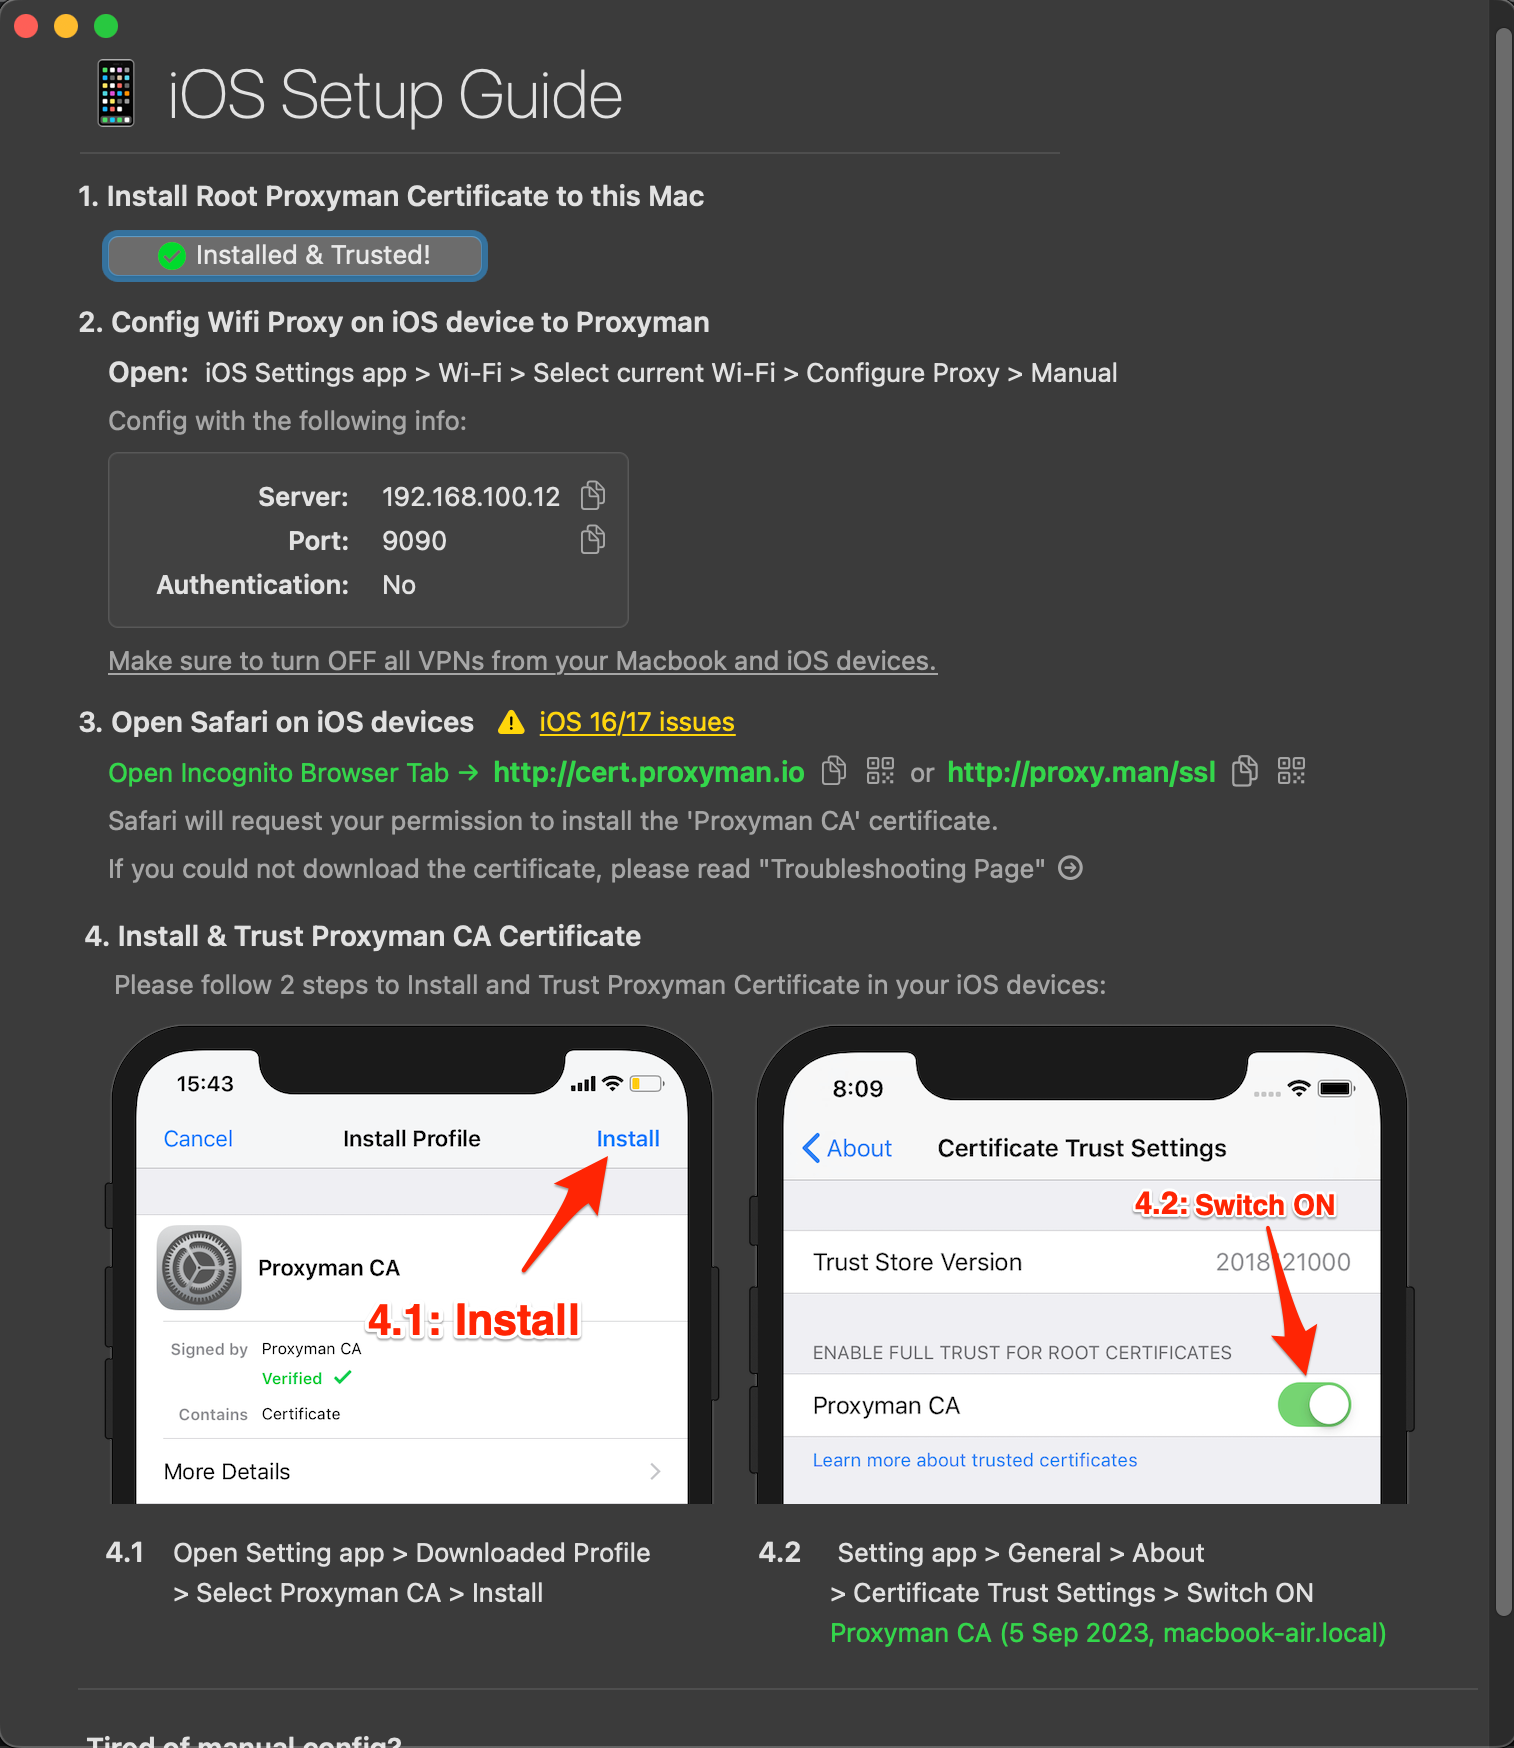
To view the installation instructions, navigate to the Certificate menu -> Install Certificate on iOS -> Physical Devices.
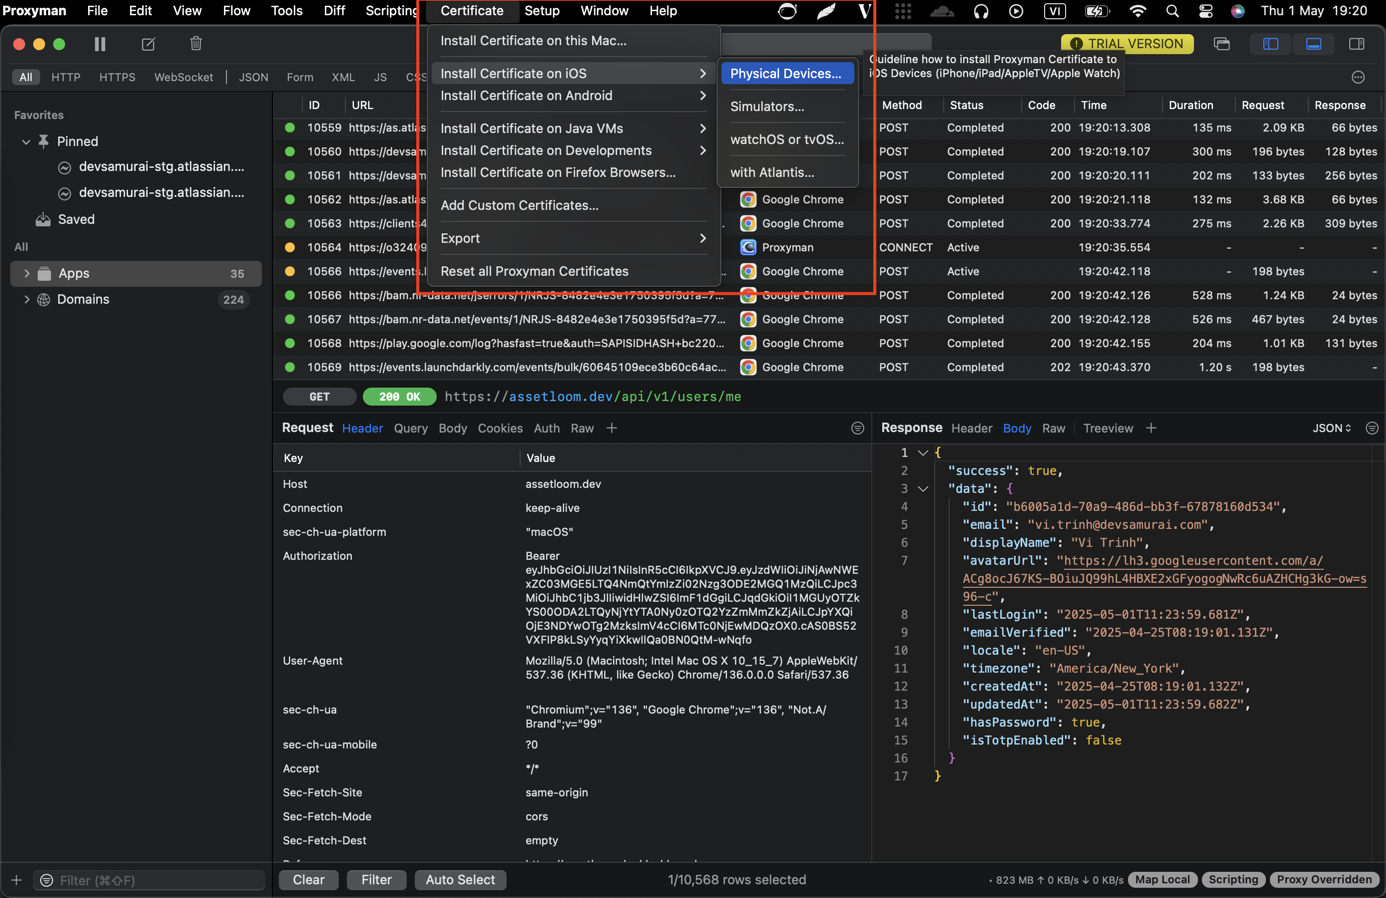
To install Certificates, you need to follow the steps in the correct order as shown in the image below:
- Find the local IP address of your computer running Proxyman. (On Windows, open Command Prompt and type ipconfig. On macOS/Linux, open Terminal and type ifconfig or ip addr). Look for the IP address associated with your Wi-Fi adapter (usually starts with 192.168.x.x or 10.x.x.x).
- On your mobile device (iOS or Android), go to Wi-Fi settings.
- Find the Wi-Fi network you are connected to and tap the info/settings icon next to it.
- Look for "Proxy" settings and change from "None" or "Auto" to "Manual".
- Enter the local IP address of your computer as the Server/Hostname and Proxyman's Port as the Port.
- Save the settings.
Congratulations, you've successfully convinced your device that Proxyman is the only gateway to the internet. It's like telling your kids all mail must go through you first. The power!
Enable HTTP response on domains or clients
How to set up SSL Proxying to tell Proxyman to capture/decrypt HTTPS data from certain websites by Host name, Regex,...
A list of domains or applications for which Proxyman should decrypt its SSL Connection. It enables users to inspect the HTTPS Request/Response in plain text.
1. Include List and Exclude List
You can define rules for:
- Include List: Intercept the traffic from apps/domains if it's in the include list.
- Exclude List: Ignore all traffic from apps/domains in the Exclude List.
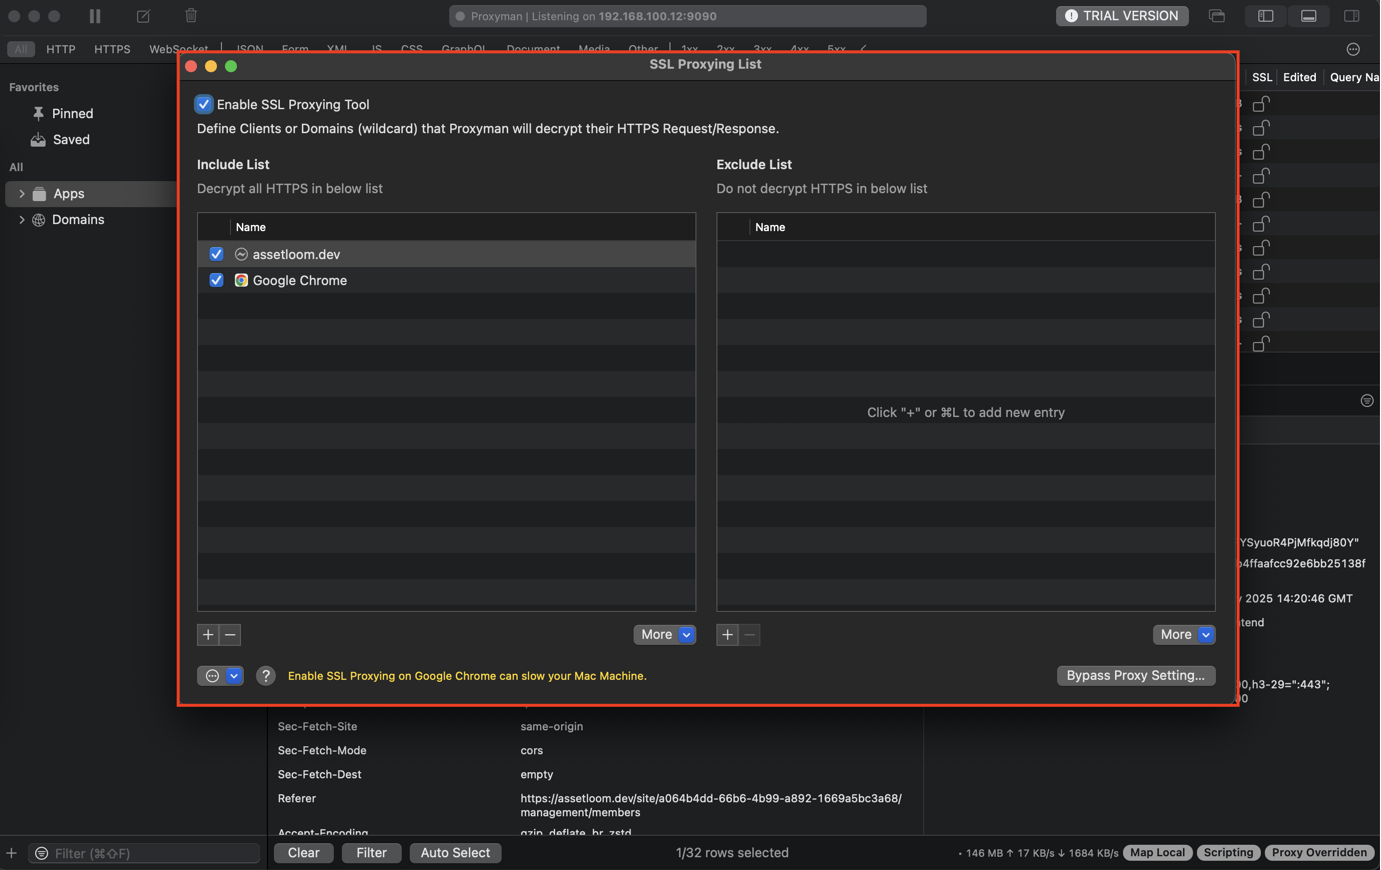
⌘⌥P to quickly open the SSL Proxying List.
2. How to enable SSL Proxying on a particular domain or app
Right-click on the app or domain on the Left Panel -> Enable SSL Proxying
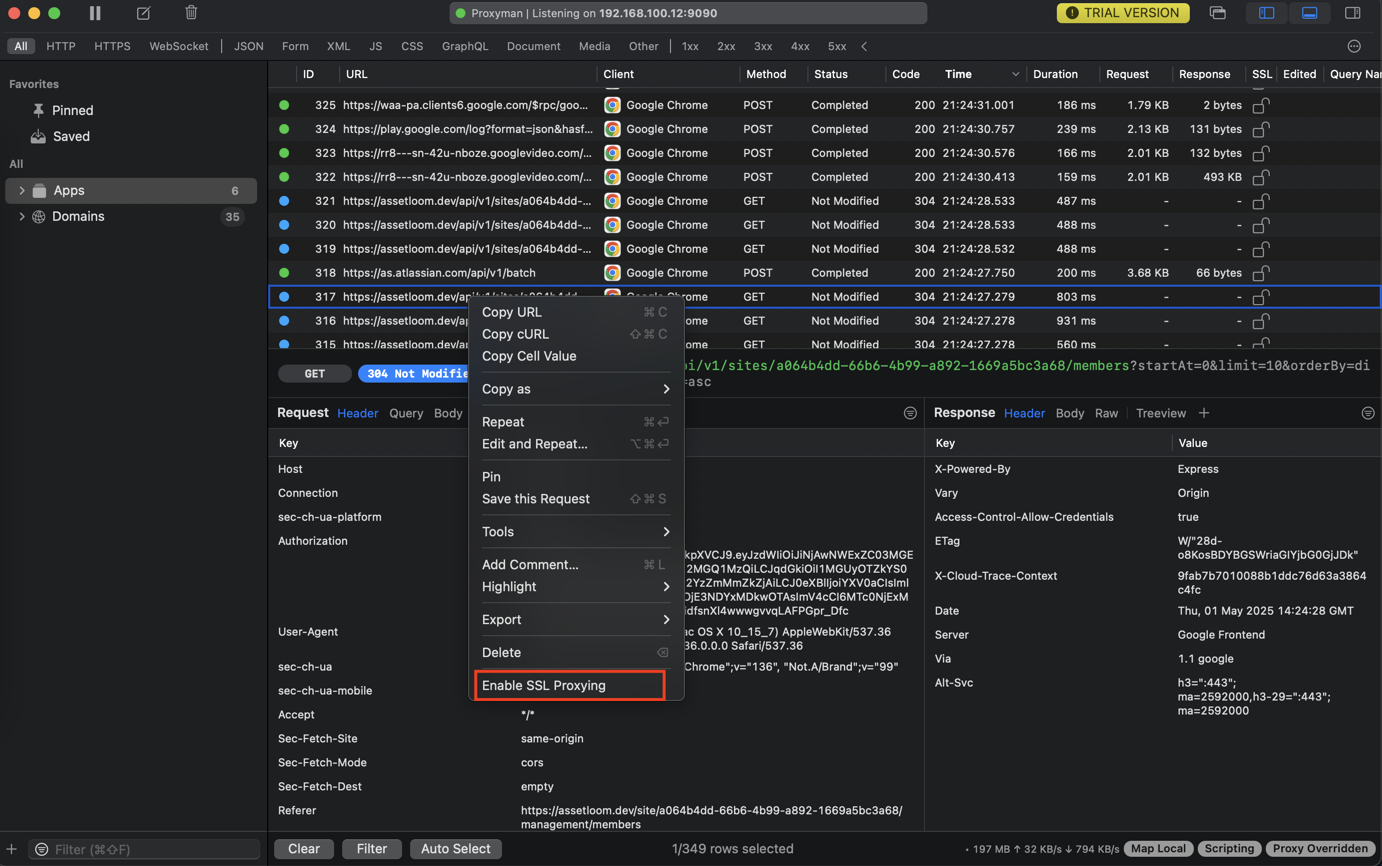
- Right-click on the Request on the main table -> Enable SSL Proxying
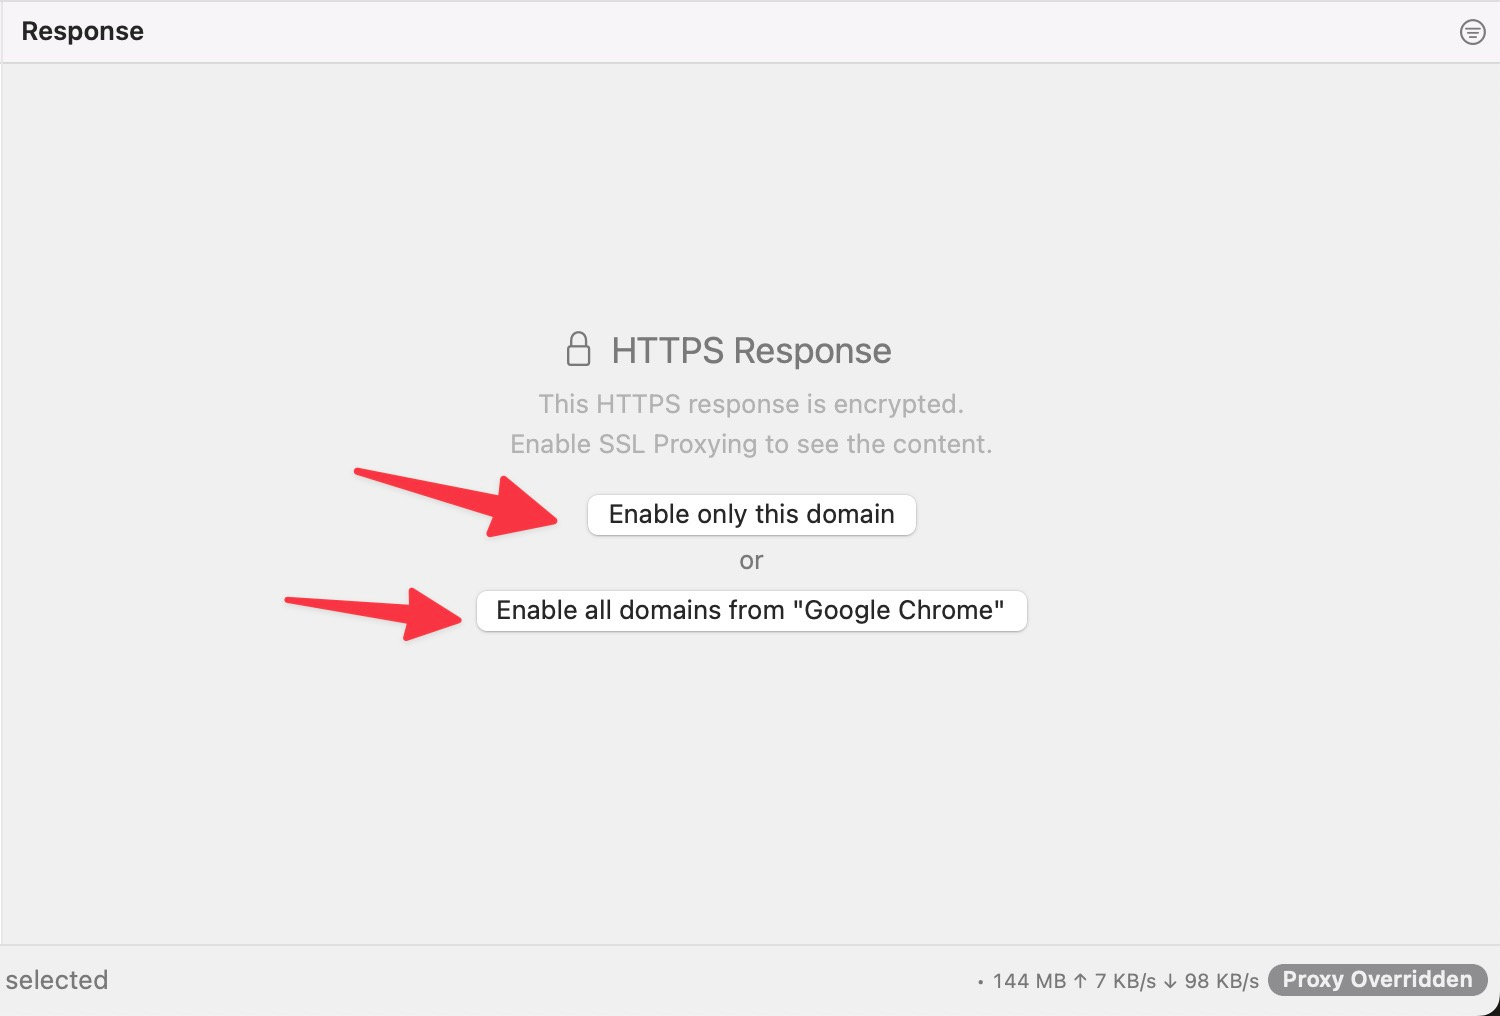
- Select the request and enable SSL Proxying on the Response Panel.
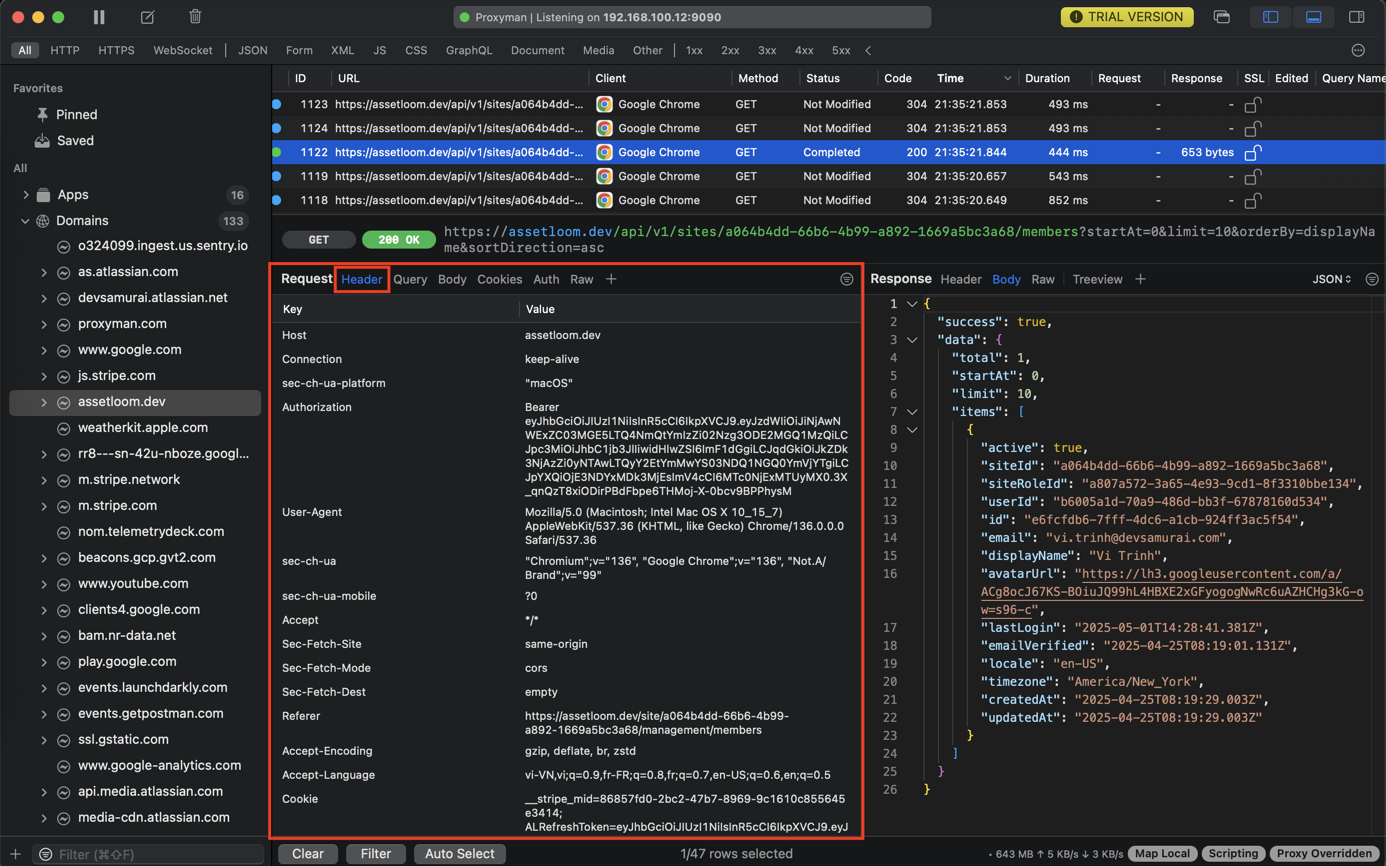
Your first interception: Watching the traffic flow
1. Request / Response previewer
Display the Request/Response body with multiple formats, such as JSON, Tree View, Raw,...
After installing the Certificate and enabling HTTP Response on domains or clients, your network traffic would show up immediately inside the Proxyman window, separated into three main areas:
- The Source List - Where All Apps and Domains Are Displayed.
- The Flow List - All requests from the selected Source (App/Domain).
- The Flow Content - Display detailed information of the selected Request (Request/Response).

2. Body Content previewer
Depending on what the content of the Request or Response is, Proxyman will automatically show in separate tabs:
- Header: All headers (key-value table)
- Cookies: Cookie key in the header
- Set-Cookie for the Set-Cookie Header in the Response
- Auth: Authentication key in the header
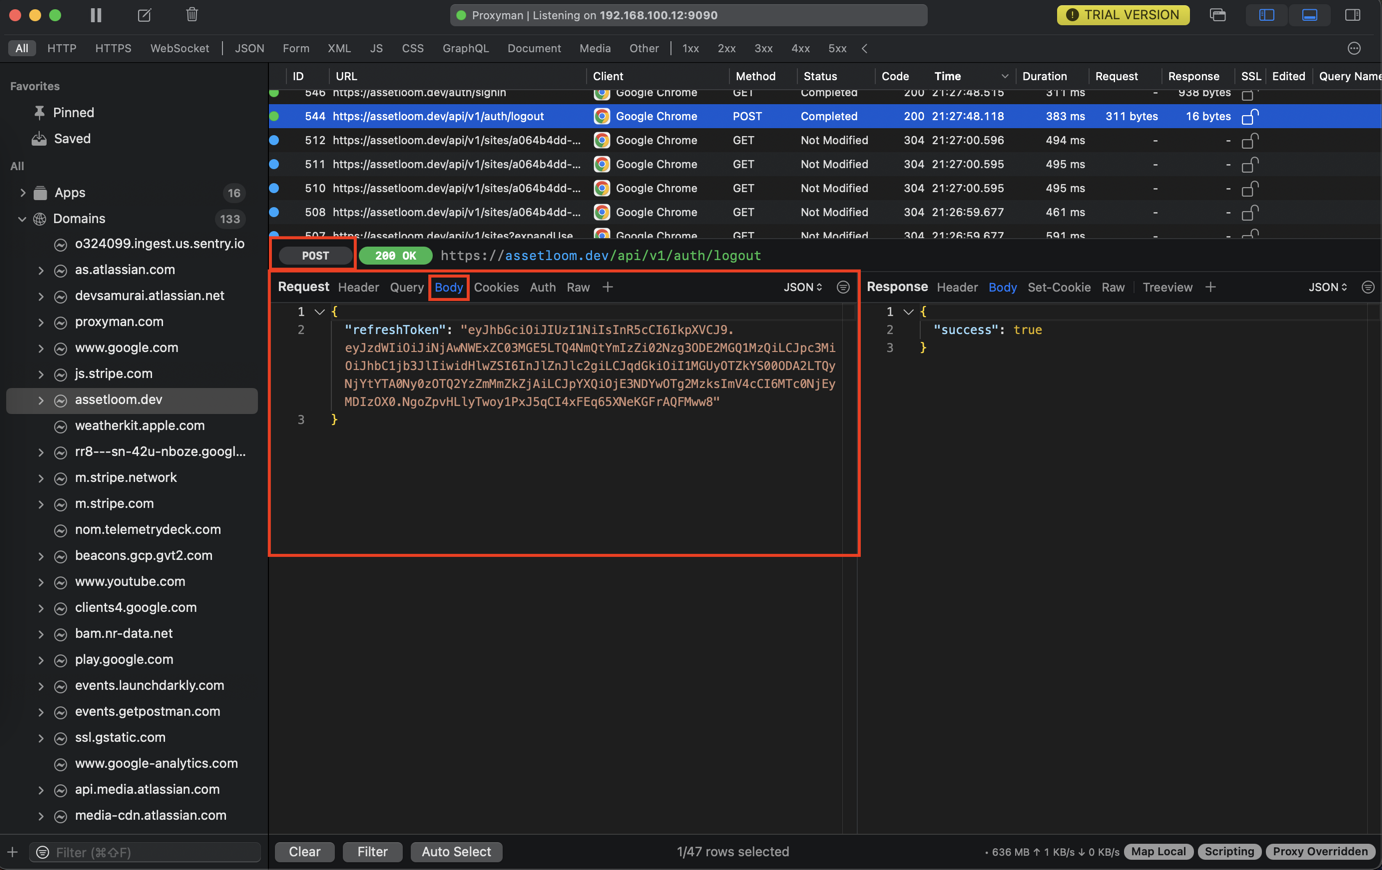
- Body: The body of the message: Proxyman automatically formats and beautifies the body content depending on the Content-Type, such as JSON, PNG, GIF, Raw Data, ...
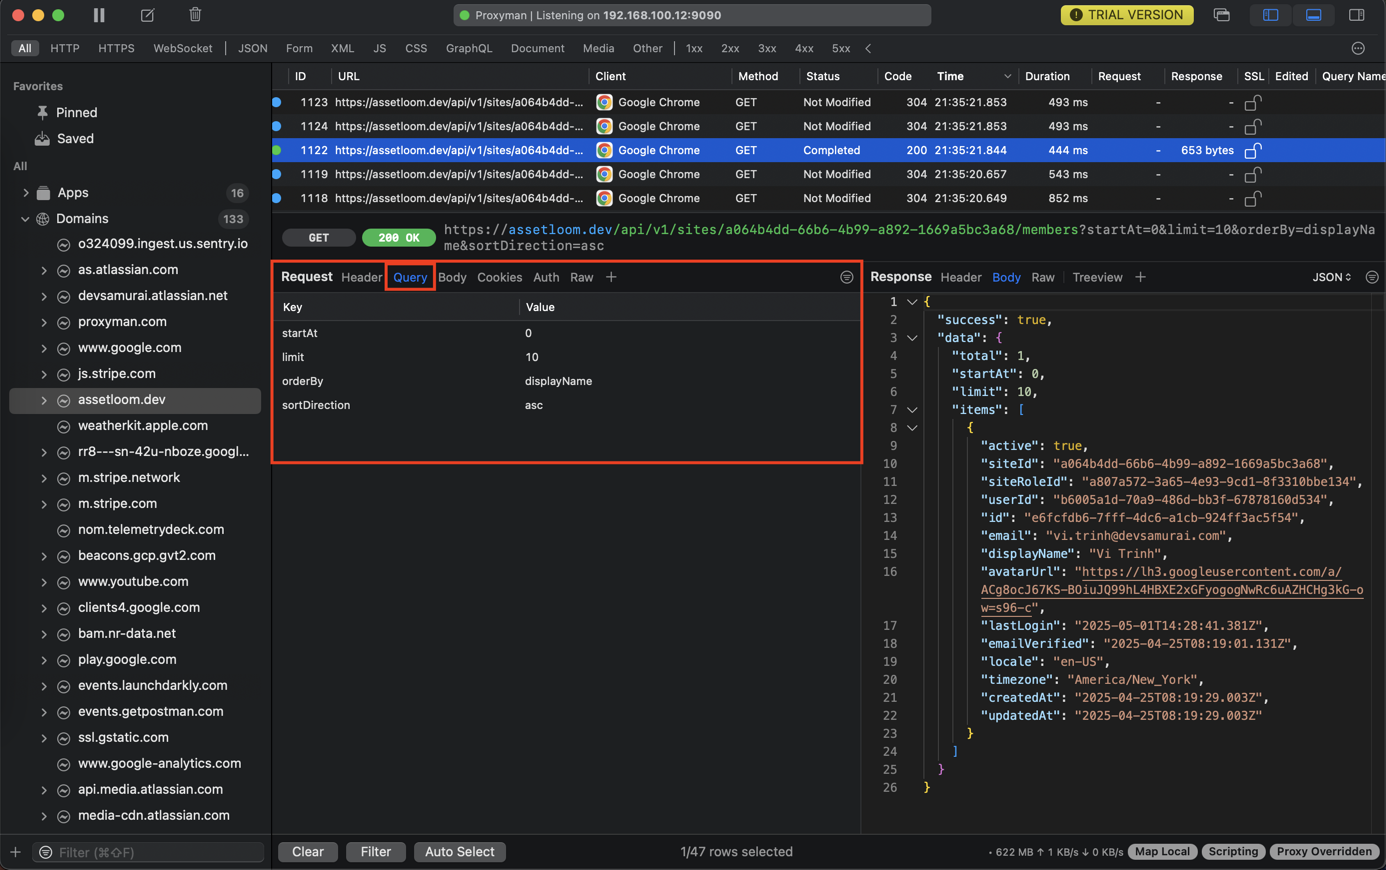
- Query: If the request has a query, all queries are presented.
- Raw: The RAW HTTP message.
- Protobuf Message
- MessagePack
- Multipart/form-data

3. Peeking inside: Inspecting requests and responses
You can click on any request in the list. The details panel will usually light up, showing you everything about that specific communication.

Overview: Basic info like the URL, method (GET, POST, PUT, DELETE, etc.), status code (200 OK, 404 Not Found, 500 Internal Server Error, etc.), and timing.
*Request Tab:
- Headers: See all the headers sent by the client (User-Agent, Cookie, Authorization, Content-Type, etc.). Crucial for checking auth tokens, session cookies, etc.
- Query Params: If it's a GET request, see the parameters appended to the URL.
- Body: If it's a POST or PUT request, see the data sent to the server (e.g., JSON, form data). This is where you'll see the username and password on a login request (handle with care!), or the details of an item being added to a cart.
*Response Tab:
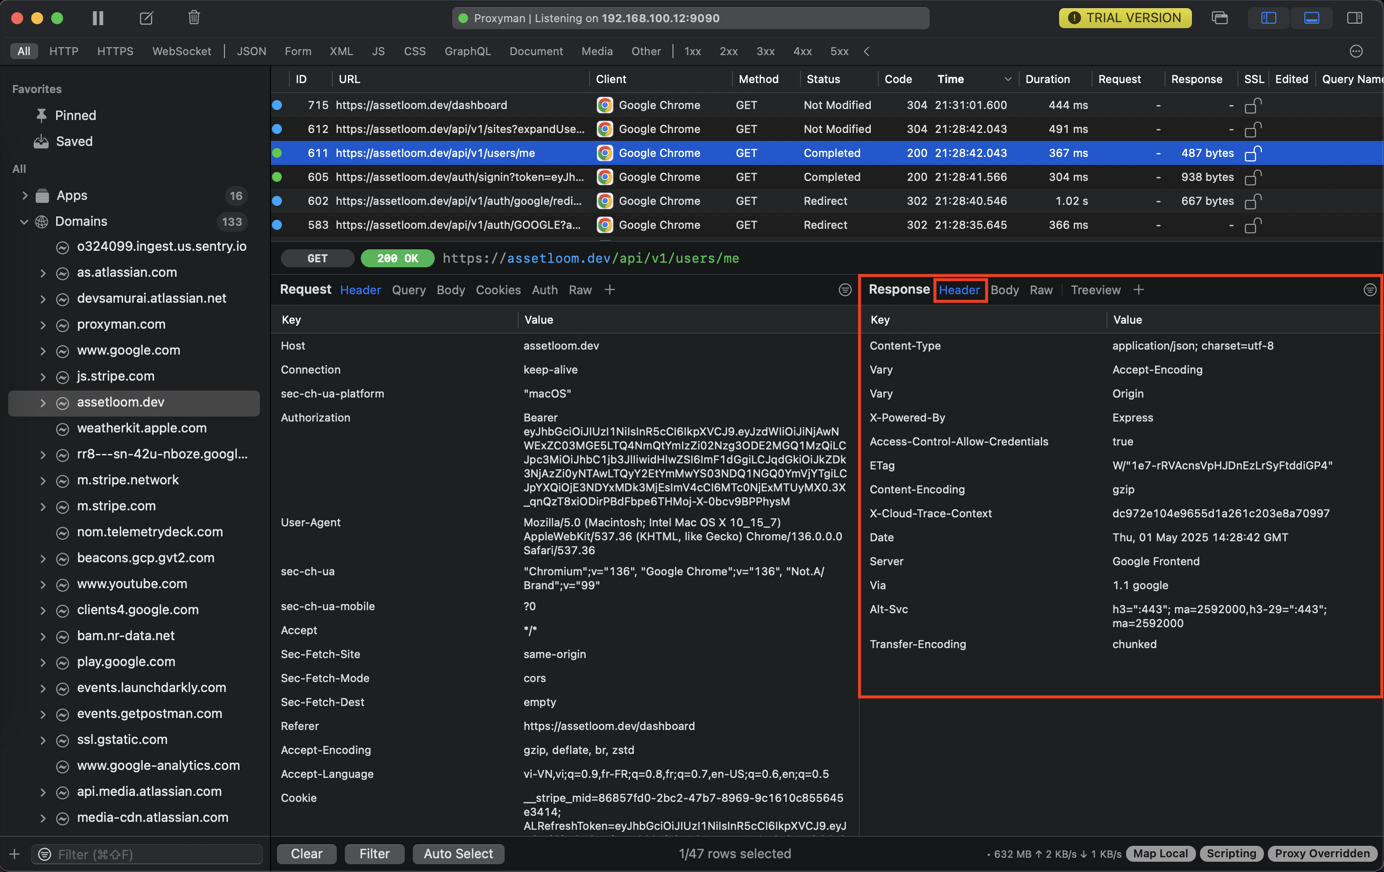
- Headers: See the headers sent back by the server (Set-Cookie, Content-Type, Cache-Control, etc.)
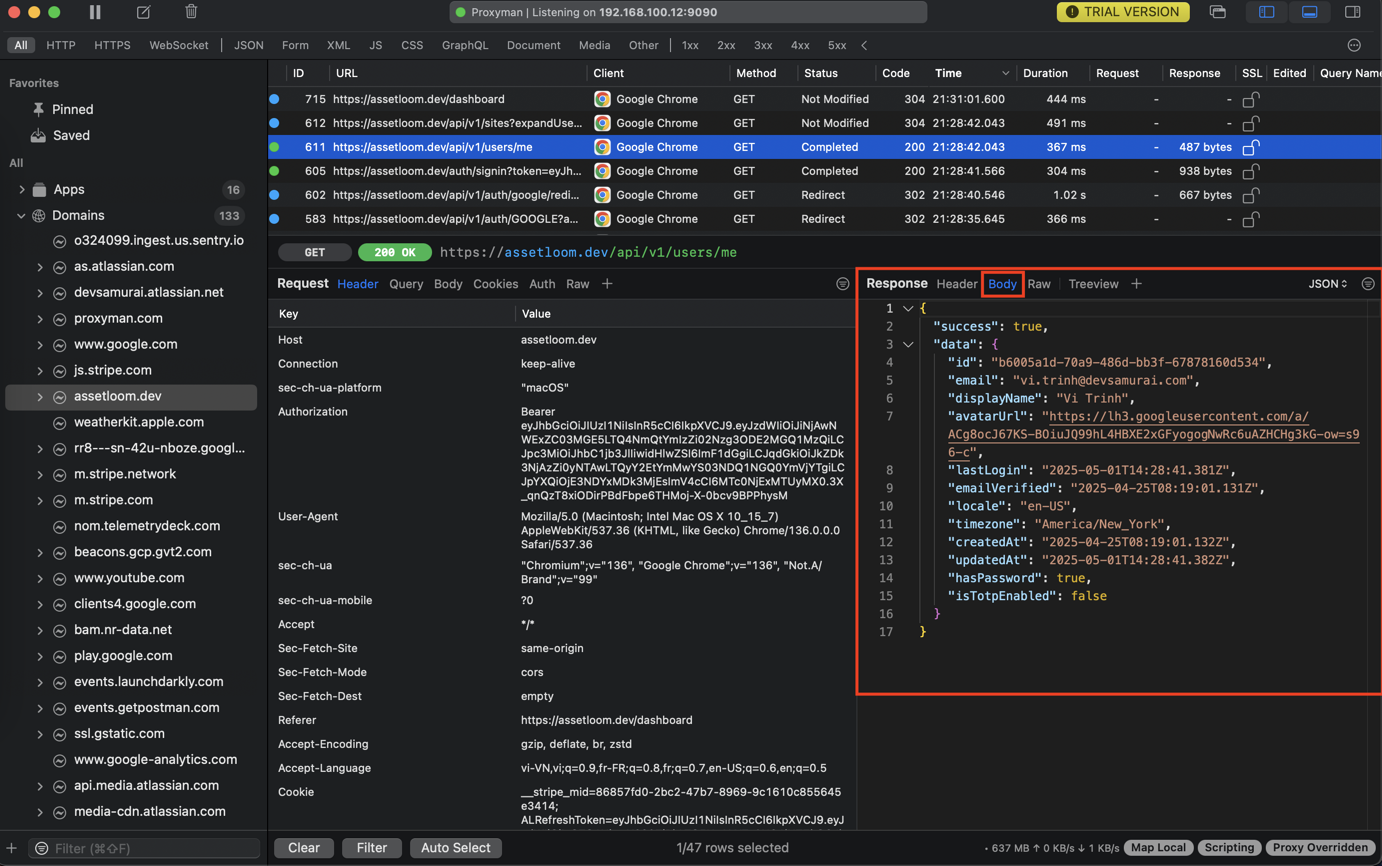
- Body: See the data returned by the server (e.g., JSON, HTML, images). This is what your application receives and processes.
Content filter
When testing a complex application, especially a webpage, you'll often see hundreds of requests: URL, Header, Body, Status Code by contains, not contains, prefix, suffix, and regex. Therefore, you should quickly filter the URLs with many criteria.
In this Proxyman tutorial, it offers the Primary and Secondary Filters to quickly filter out the Requests or Responses you're looking for.
- URL/Host: Show only requests going to a specific domain (api.example.com) or containing a specific path (/users).
- Method: Show only GET requests, or only POST requests.
- Status Code: Show only errors (4xx, 5xx), or only successful requests (2xx).
- Content Type: Show only JSON requests, or only images.
1. Search for App/Domain
- Press Ctrl+Shift+F to see the search input in the bottom left corner of the focus column.
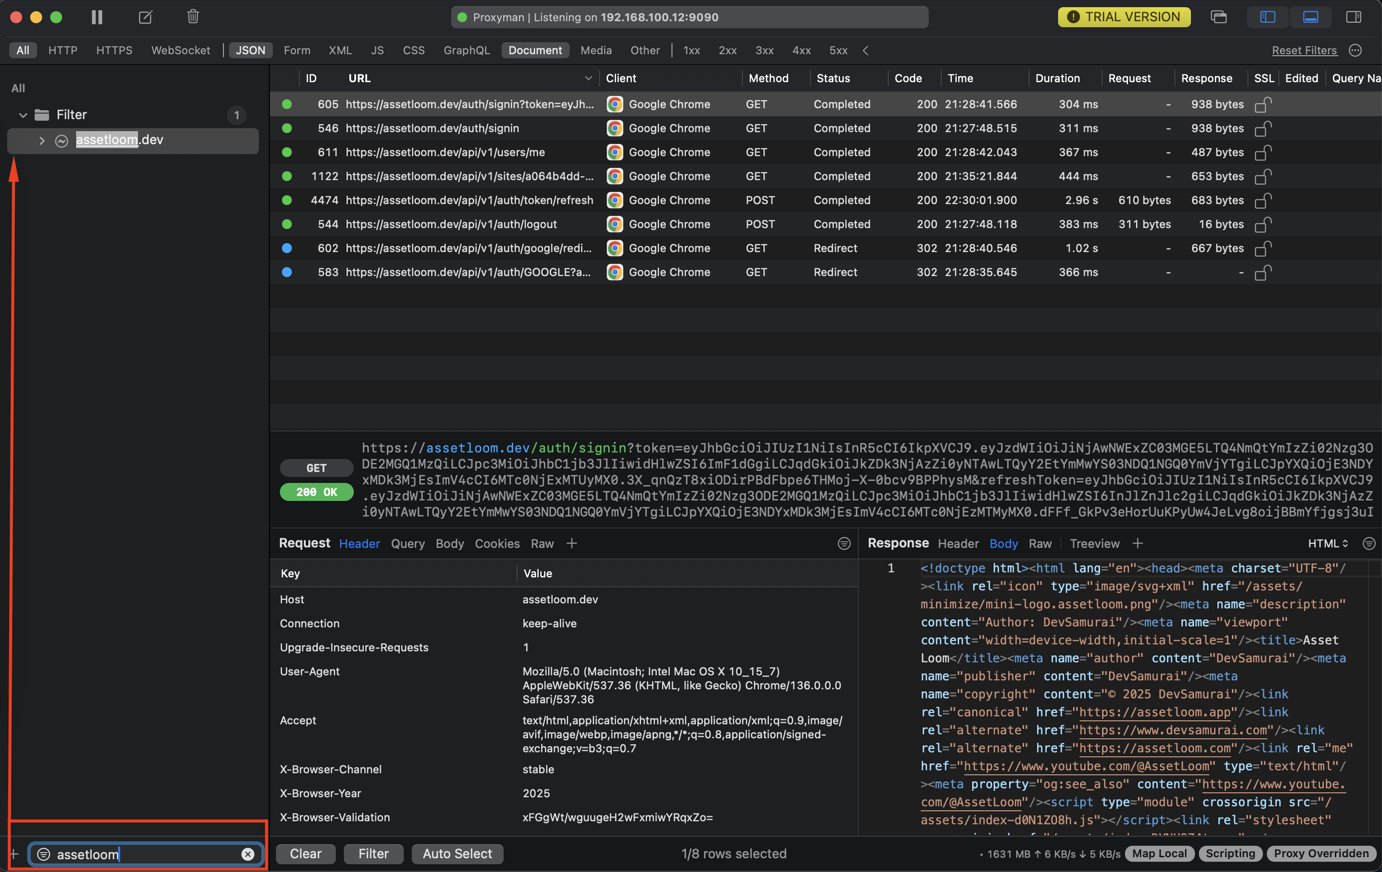
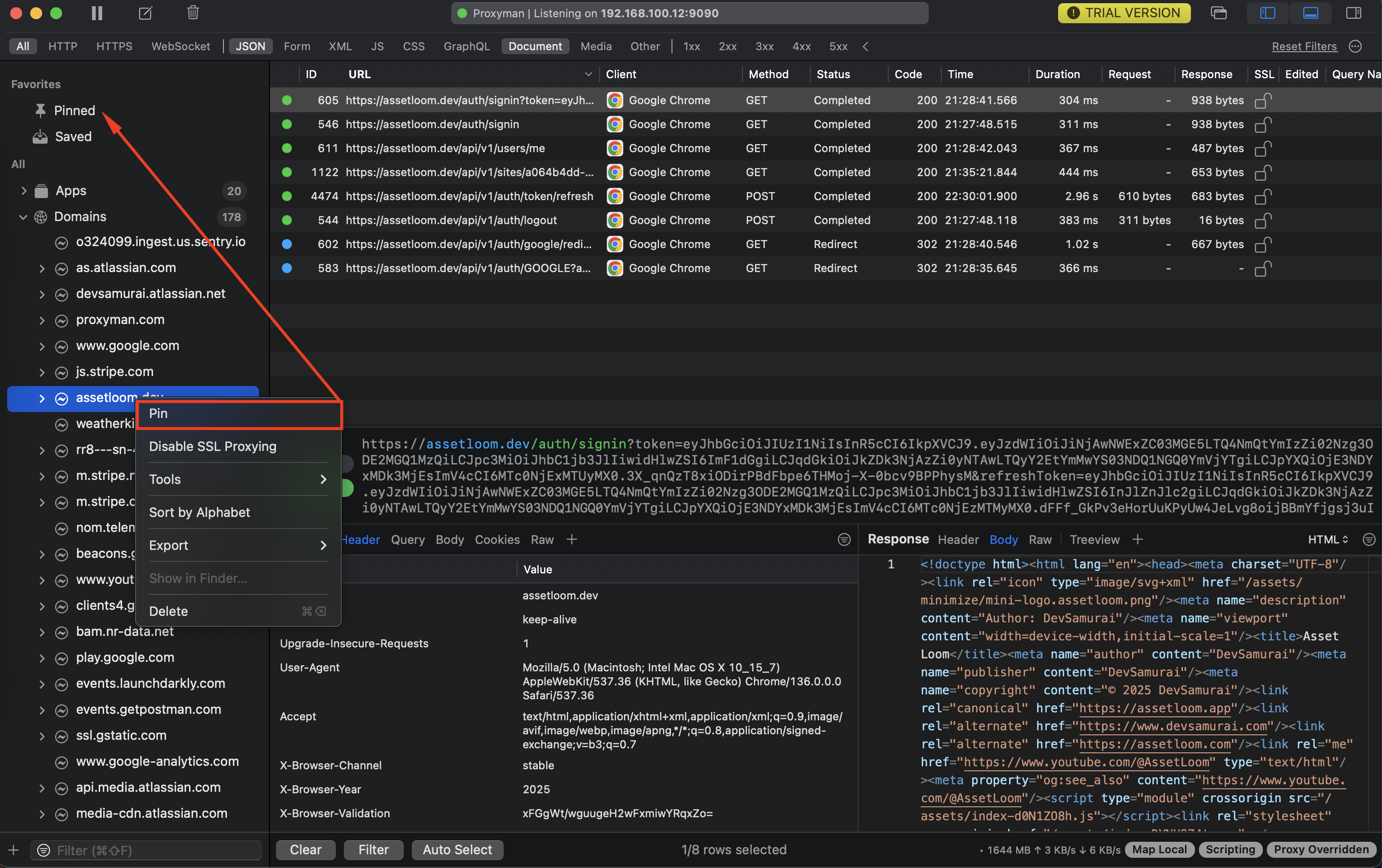
- If you frequently need to debug specific Apps/Domains, you can right-click on that App/Domain and select Pin so you won't have to search for it again next time.
2. Primary filter
Here are all the primary filters you’ll find within the app:
| Filter | Description |
|---|---|
| All | All Requests and Responses |
| HTTP | Only HTTP |
| HTTPS | Only HTTPS |
| WebSocket | Only WebSocket and Secure WebSocket |
| JSON | Content-Type is application/json or JSON content |
| XML | Only XML |
| Form | Only Form Body in Request / Response |
| JS | Only JavaScript content |
| CSS | Only CSS content |
| Document | Document content: HTML,... |
| Media | Image contents: PNG, JPG, GIF,... |
| Other | Other contents which not match the above |
| Font | All font families |
| GraphQL | GraphQL Request (has suffix /GraphQL) |

Additionally, you can select multiple types by holding CMD and clicking to select multiple types.

3. Status filters
| Filter | Description |
|---|---|
| 1xx | Status Code from 100-200 |
| 2xx | Status Code from 200-300 |
| 3xx | Status Code from 300-400 |
| 4xx | Status Code from 400-500 |
| 5xx | Status Code from 500 |

4. Secondary filter
- Press Ctrl+F to see the search input at the top of the middle focus column.
- You can filter most fields in an HTTP Request, such as URL, Request Header, Response Body, Status Code, etc.
- Proxyman supports multiple filters; however, you can only have one filter at a time in the Free version.
- ESC to close the Filter Bar

- Filter Requests from the Selected App/Domain
Content
- URL
- Query String
- Request Header
- Response Header
- Method
- Status Code
- Comment
- Color
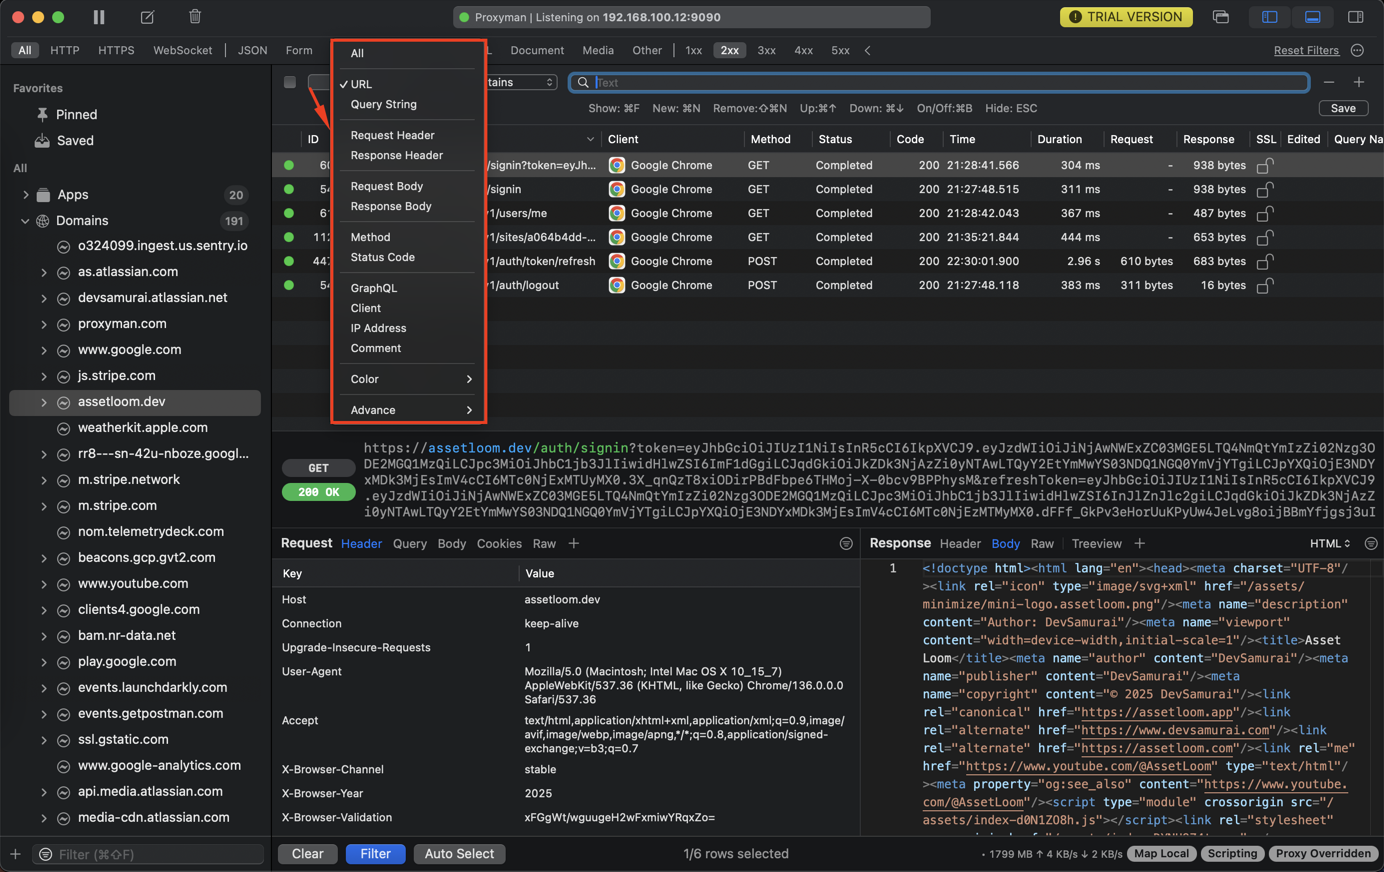
Matching
- Contains
- Not Contains
- Start With
- End With
- Equal
- Not Equal
- Regex

5. Header, Query, Auth, and Form filter
From Proxyman 2.34.0+, we can quickly filter the Header, Query, Auth, and Form from the selected Request and Response.
- Click on the view (e.g., Header of the Request)
- Use Hotkey:
CMD + For click the Filter icon

Unlocking superpowers with Proxyman tutorial: Modifying traffic
Now, this is where Proxyman goes from insightful observer to active participant. The ability to change requests and responses on the fly opens up incredible testing possibilities.
Moreover, Proxyman offers features like Map Local, Rewrite, and Breakpoints for this.
1. Map Local (File)
The Map Local tool enables you to use the content of local files as an HTTP Response to your requests.
1.1 Benefits
- Define a Response with Status Code, Headers, and Body -> Mock a given Request -> Easily test some edge cases without waiting for the server's update.
- Mock Fake API with a local File: It's useful for developers to try out the testing APIs that are not in production.
With an HTTP Message
- Right click on your request on the main table -> Tools -> Map Local -> Proxyman will automatically create a new rule with the current Response.
- Feel free to change the Status Code, Headers, and the JSON Body
- Done
- Resent your request -> New Response is mapped.
With a Local File
- Click on the Select Local File button and select any files. Supports: Text, JSON, Binary, Image
With <FILE_URL> flag
- It's useful to map to a given file and can provide the Status Code and Response Headers.
- Work with JSON, Text, Binary, Image, etc.
- Make sure to provide the Content-Type header, so your client can work properly.
HTTP/1.1 200 OK
Content-Type: application/json

<FILE_URL="~/Desktop/myjson.json">
1.2 How to use
- Right click on your request on the main table -> Tools -> Map Local -> Proxyman will automatically create a new rule with the current Response.
- We can directly change the Response body.
- Make a request and observe the new Response Body.


2. Map Remote
Map Remote (⌘⌥R) would help the developer to change the HTTP Request's location to a new destination server, per the configured rules, so the HTTP Response is transparently served from your client.
Map Remote also supports mapping from HTTP to HTTPS and vice versa.
2.1 Benefits
In this Proxyman tutorial, you can discover some benefits of using Map Remote as below:
- Use Production Endpoints on your Development website on certain endpoints without changing the source code
- Use Development Endpoints on your Production website
- Change certain requests' URLs to different destinations
- Able to replace request components, such as Protocol, Host, Port, Path, or Query on the fly
2.2 How to use
Now, it's time to learn how to use Map Remote in this Proxyman tutorial.
Right-click on the selected Request -> Tools -> Map Remote: Proxyman will fill in the necessary data from the selected request.

Similar to Map Local, you can also add, edit, delete, and enable/disable rules from the following screen.

2.3 Common usages
- Map Localhost (HTTP) to Production (HTTPS)
- Map Production (HTTPS) to localhost (HTTP)
- Map a certain URL to another host
- Map Websocket from localhost to Production
- Map Websocket from Production to Localhost
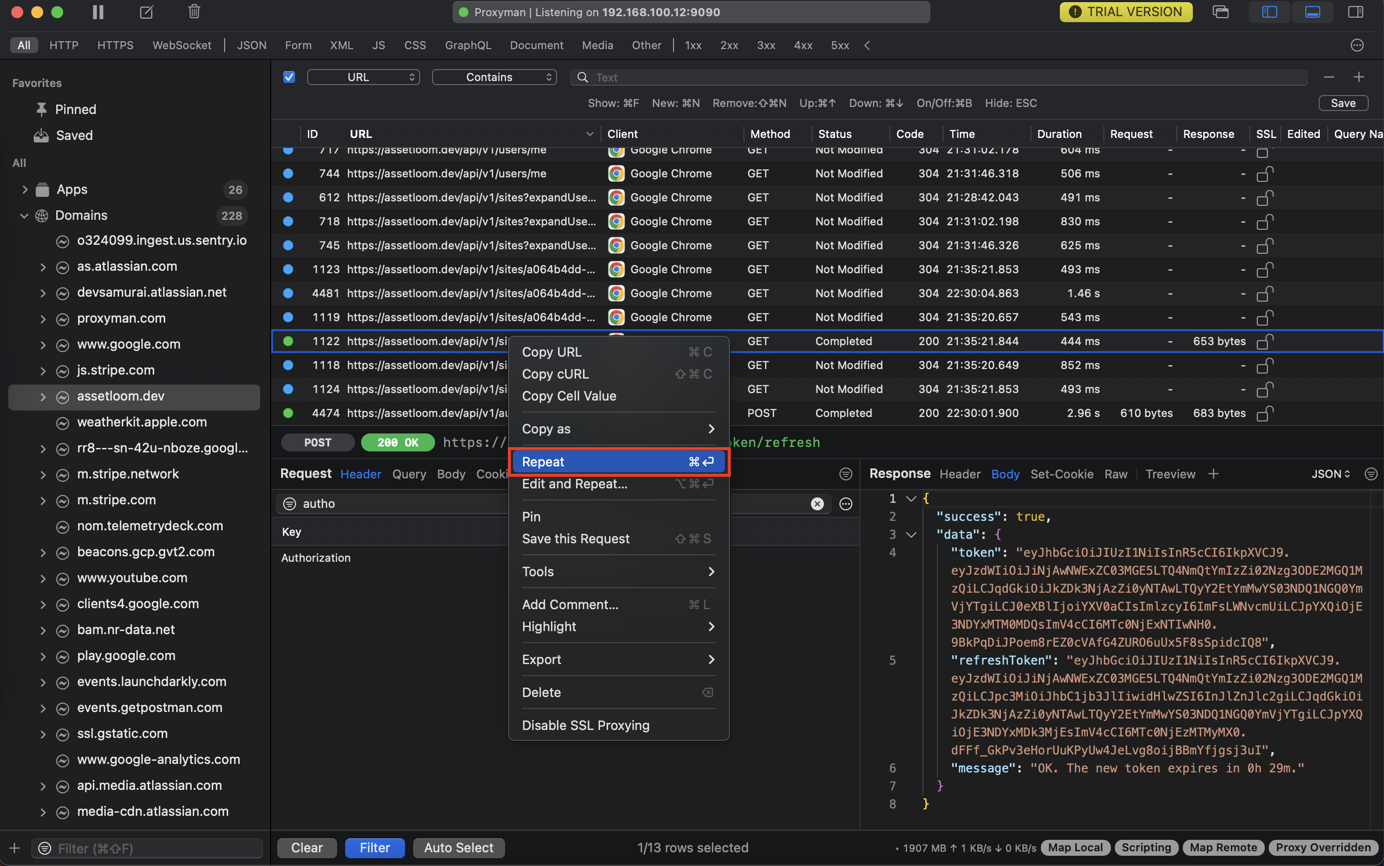
3. Repeat
Repeat tool is a useful tool for quickly making a new HTTP request with the same HTTP headers and Body to see the new response without changing your browser or clients.
3.1 Benefits
Here are some of the benefits of using Repeat:
- Quickly make an HTTP/HTTPS Request for testing the newest response from the server.
- It's useful for developers to test the change on the server without repeating the request manually.
NOTE
- The Repeat tool only supports HTTP/HTTPS Requests. Repeat on WS/WSS traffic might fail.
- Repeated requests can be modified by the Breakpoint, Map Local, and Scripting tools if they match any rules.
3.2 How to use
- Right-click on a single or multiple Request(s) -> Repeat
NOTE: Use ⌘ ⏎ to repeat the current selected request.
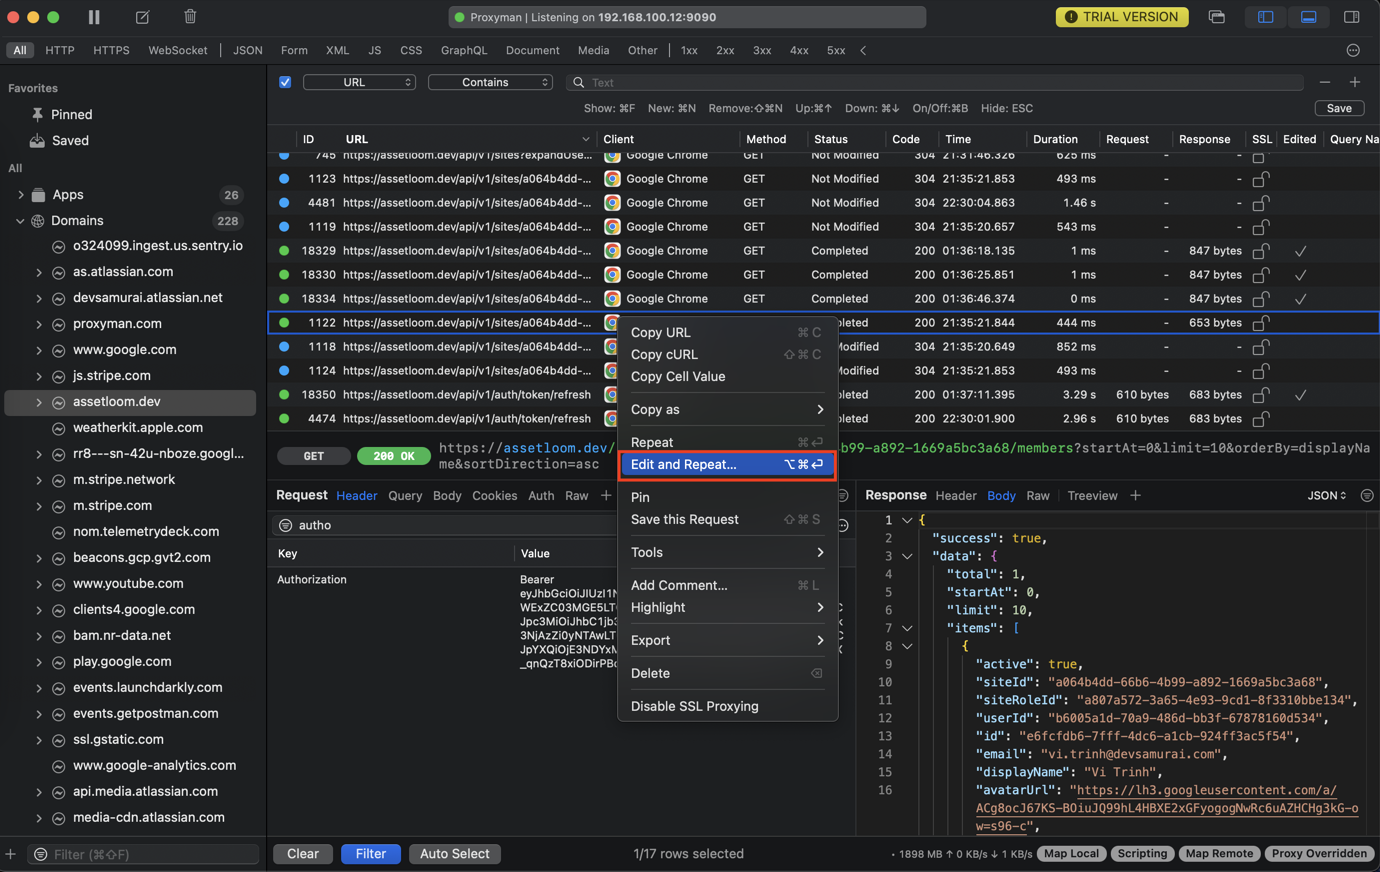
- Show information about the request:

- Change
siteIDand click Send:
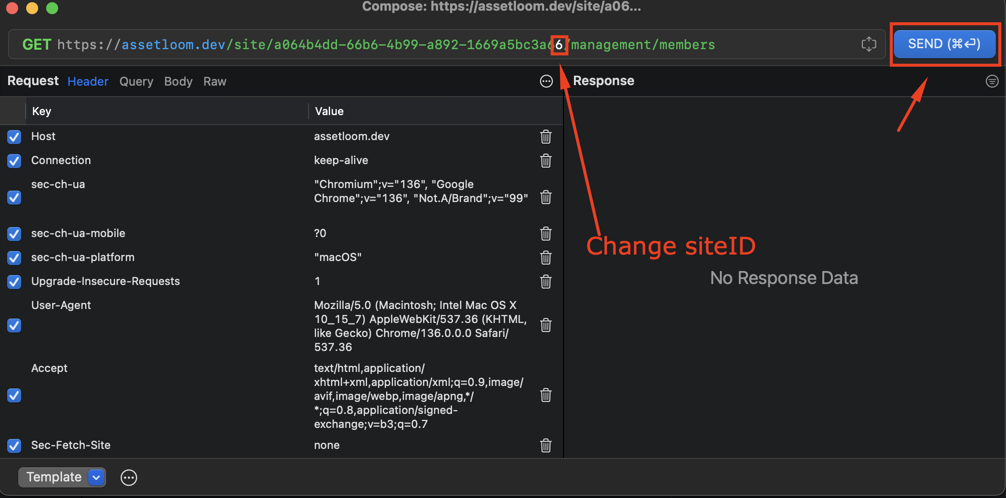
Results after changing:

3.3 Settings
Request Timeout: In Settings -> Tools Tab -> Request Timeout, Define a second after which the Request will timeout. Use 0 to disable it. Available on Proxyman 4.13.0 or later
4. Breakpoints
Breakpoint is a handy tool to help developers edit the content of the Request and Response on the fly.
It's possible to set a breakpoint on both Request and Response.
4.1 Features
The Breakpoint tool allows the developer to stop an ongoing Request or incoming Response to modify its data.
- Modify the Request URL, including the Scheme, Host, Path, Port, and HTTP Method (Available on Proxyman 2.35.4+)
- Modify HTTP Headers of Request/Response
- Modify Query or Form entry from Requests.
- Modify Authorization/Cookie/Set-Cookie Headers.
- Modify HTTP Body of Request/Response
- Change Response HTTP Status Code.
4.2 Breakpoint Actions
| Action | Meaning |
|---|---|
| Cancel | Cancel a breakpoint and continue the Request/Response |
| Abort | Abort the connection and return the 503 status code |
| Execute | Make a request/response with a new change |
4.3 Breakpoint by the Scripting tool
If you would like to do Breakpoint in an Automatic way, you should use the Scripting tools, which can achieve the same result that Breakpoint can do, but in a flexible way by writing JavaScript code.
Please check out this Snippet Code to understand how to use Scripting for Breakpoint.
4.4 Breakpoint with GraphQL Requests
From Proxyman 2.27.0+, Breakpoint can work with GraphQL Request by a specific QueryName. Please check out the following GraphQL Document.
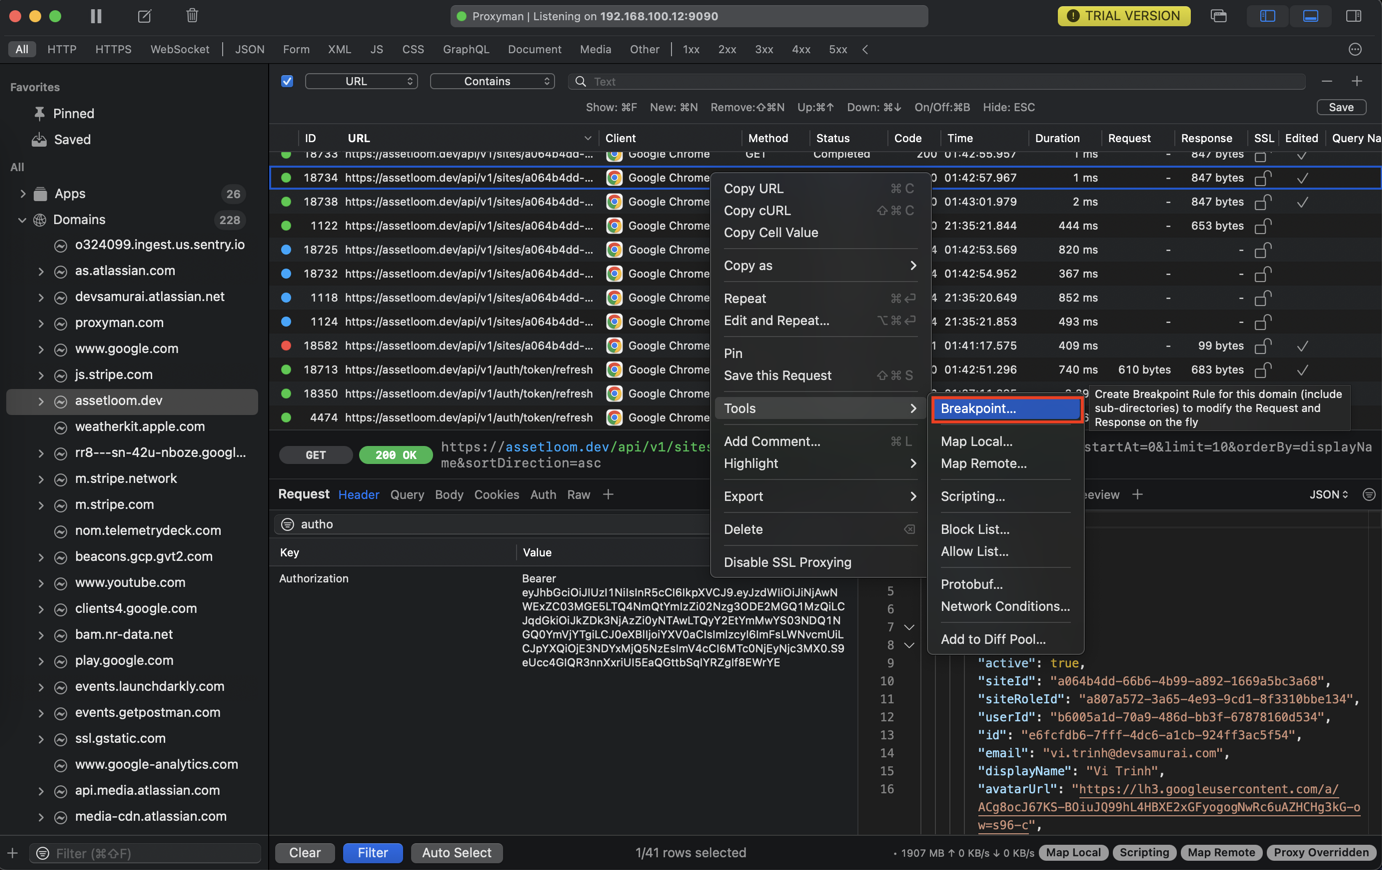
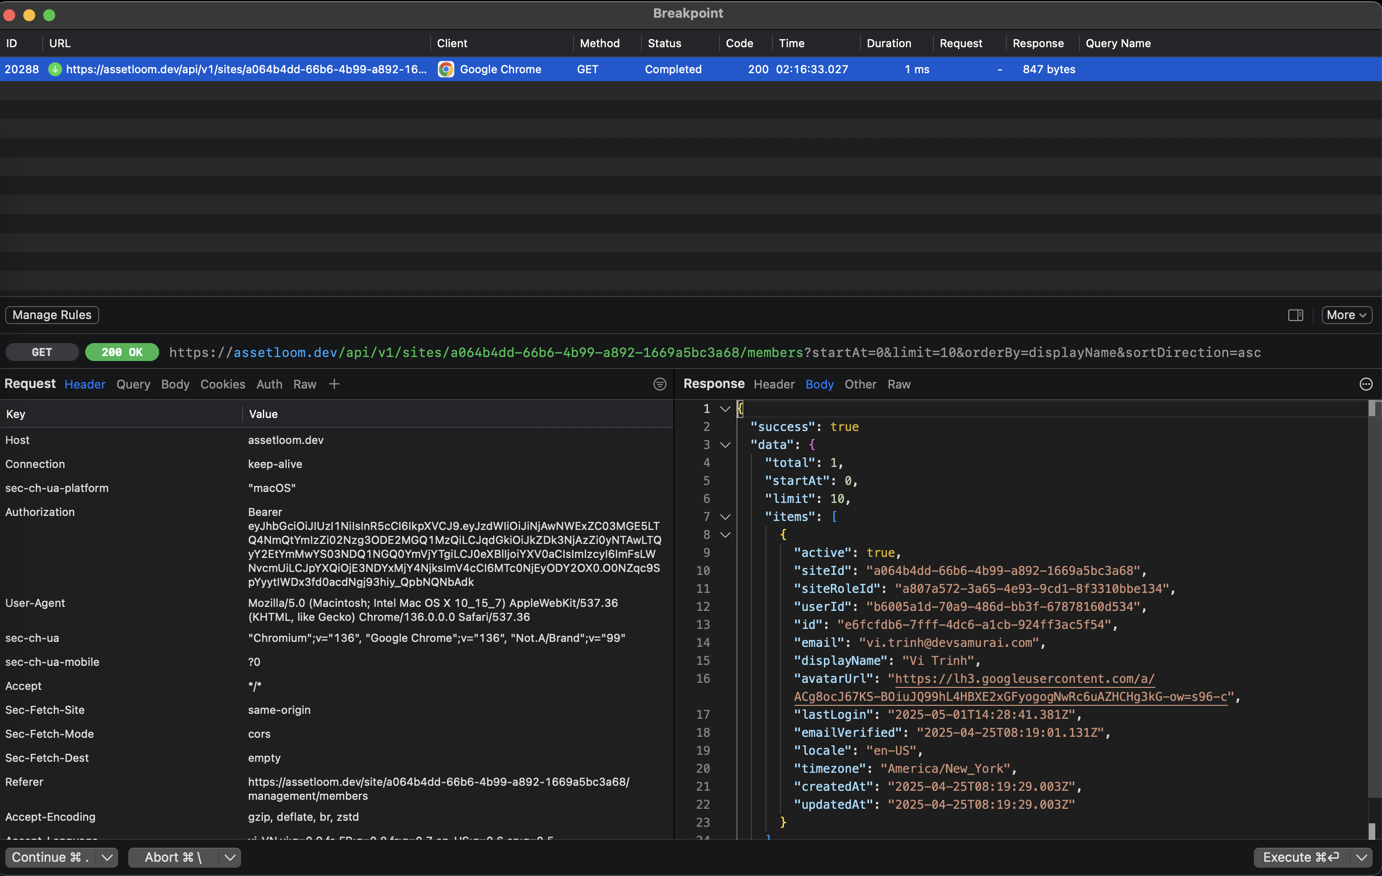
4.5 How to use
You can simply create a Breakpoint rule by:
- Right-click on the Request -> Tools -> Breakpoint
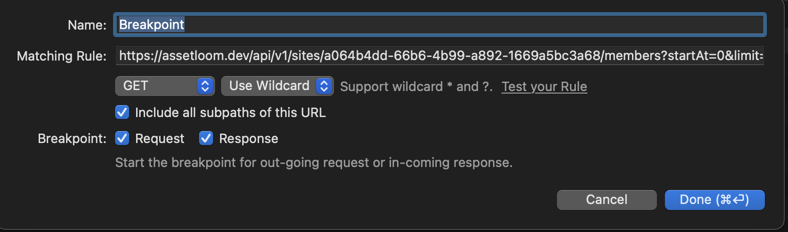
- Proxyman will open a Breakpoint Window and fill out the Matching Rule.
- Select Breakpoint on Request or Response, or both.
- Click Add to create a rule.
- Try sending a Request again -> Proxyman will open a Breakpoint and you can modify the data.
- Click on the Execute button to send a request/response.
Tips from your evangelist
- Stay organized: As your list of intercepted requests grows, use sessions or filters to keep track of what you're doing. Proxyman often allows you to save and load sessions.
- Name your rules: When creating Rewrite or Map Local rules, give them descriptive names so you remember what they do.
- Enable/Disable rules: Don't delete rules when you're done; just disable them. You might need them again later!
- Check the logs: If traffic isn't showing up, check Proxyman's logs or status messages for clues (e.g., connection errors).
- Mind the Certificate! If you're having trouble with HTTPS, it's almost always an SSL certificate issue. Double-check that the certificate is installed and trusted correctly on the client device.
- Be ethical: Only use Proxyman to intercept traffic from applications and systems you have explicit permission to test. Don't use it to snoop on others' traffic!
Conclusion: Go forth and whisper to traffic!
See? Proxyman isn't scary. It is a powerful, insightful, and frankly, pretty fun tool that gives you unprecedented visibility and control over your application's network communication. It turns the black box into a transparent one, allowing you to debug faster, test more thoroughly, and understand your application on a deeper level.
So, what are you waiting for? Download the app, use this Proxyman tutorial to set up your first proxy, and start exploring the hidden conversations of your applications. Become the traffic whisperer you were always meant to be!
Happy testing! May your status codes be 200 and your bugs be few (and easily found with Proxyman)!