Tired of wrestling with flaky tests and browser tantrums? Meet Playwright, Microsoft’s open-source superhero for end-to-end web testing! This nifty tool laughs in the face of cross-browser chaos, auto-waits like a pro, and debugs with the finesse of a stand-up comedian.
In this Playwright tutorial, we’ll zip through installing this testing tool, crafting slick tests, and mastering locators—without breaking a sweat. Ready to make testing as fun as a barrel of monkeys? Let’s dive in and save your web apps from the buggy abyss!
What is Playwright?
Playwright is an open-source automation library developed by Microsoft, first released in 2020. It is designed for end-to-end testing of modern web applications across multiple browsers.
Playwright is an open-source automation library, launched by Microsoft in 2020, designed for end-to-end testing of modern web applications across multiple browsers. Additionally, it excels at handling complex Single Page Applications (SPAs) and dynamic web content, delivering fast, reliable, and resilient browser automation.
With a single test suite, Playwright enables you to test on:
- Chromium (Chrome, Edge)
- Firefox
- WebKit (Safari)
Playwright supports several programming languages, including:
- JavaScript
- TypeScript
- Python
- Java
- C#
Developers and QA teams widely adopt it and address modern web challenges like cross-browser compatibility and flaky tests. As a result, Playwright becomes a go-to tool for building high-quality web applications.
Why is Playwright beneficial for QA teams?
Modern QA teams face the challenge of ensuring a consistent user experience across browsers. Playwright simplifies this with:
- Cross-browser support — Run tests on all major browsers using a unified codebase.
- Smart auto-waiting — Reduces flaky tests by waiting automatically for elements to be ready.
- Accessible selectors — Use getByRole, getByText, etc., for more robust locators.
- Rich debugging tools — Capture screenshots, videos, and execution traces.
- CI/CD friendly — Seamlessly integrates with tools like GitHub Actions, Jenkins, and Azure DevOps.
Playwright allows QA to focus more on quality assurance than test maintenance.
Compare Playwright vs Selenium
Here is a brief look at the comparison between Playwright and Selenium:
| Feature | Playwright | Selenium |
|---|---|---|
| Browser support | Chromium, Firefox, WebKit | Chrome, Firefox, Safari, Edge |
| Programming language support | JS, TS, Python, Java, C# | Java, JS, Python, C#, Ruby, etc. |
| Browser installation | Automatic (npx playwright install) | Manual |
| Locators | Role-based (getByRole, getByText) | XPath, CSS |
| Built-in auto-waiting | ✅ Yes | ❌ No |
| Debugging tools | Codegen, Trace Viewer | Limited |
| Execution speed | Fast, supports parallel tests | Varies based on config |
| Learning curve | Easier, excellent docs | Steeper, more setup required |
For more details, please read our article about comparing Playwright vs Selenium.
With that said, it’s now time to dive into the Playwright tutorial to see how to install and use it, isn’t it?
How to install Playwright
The first thing to do in this Playwright tutorial is install it, of course. You can install the tool using either of the following methods.
Method 1: Installing Playwright with the VS Code Extension
Use the Playwright Extension in Visual Studio Code to set up and manage your Playwright project with a guided experience.
To get started, install Playwright using npm, yarn, or pnpm. You can also run your tests using the VS Code Extension.
- Using npm:
npm init playwright@latest
- Using yarn:
yarn create playwright
- Using pnpm:
pnpm create playwright
If you're using the Playwright VS Code Extension, here's how to get started:
Step 1: Open a new Terminal window on VS Code
Step 2: Run the installation command from the terminal:
1. Create a new folder for your project and navigate into it.
mkdir {yourFolderName}
cd {yourFolderName}
2. Initialize Playwright by running: npm init playwright@latest

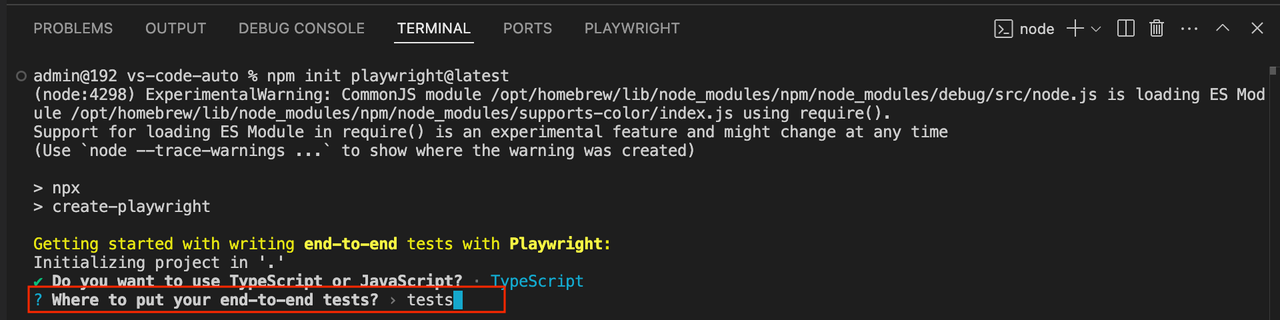
Step 3: During setup, you’ll be prompted to configure the following options:
- Choose between TypeScript or JavaScript (default is TypeScript)

- Name of your Tests folder (default is tests or e2e if you already have a tests folder in your project)
- Add a GitHub Actions workflow to easily run tests on CI (default is false, you can change it to true)
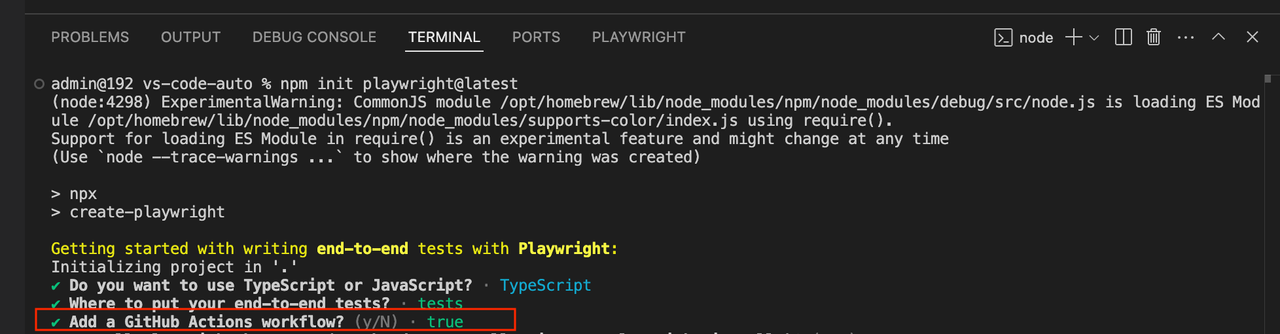
- Install Playwright browsers (default is true)

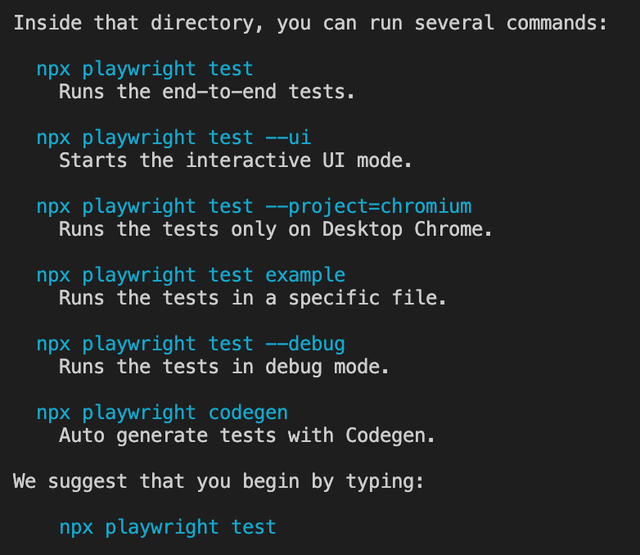
- As the installation proceeds, you’ll see typical Playwright commands appear in the terminal window.
Step 4: After the installation completes
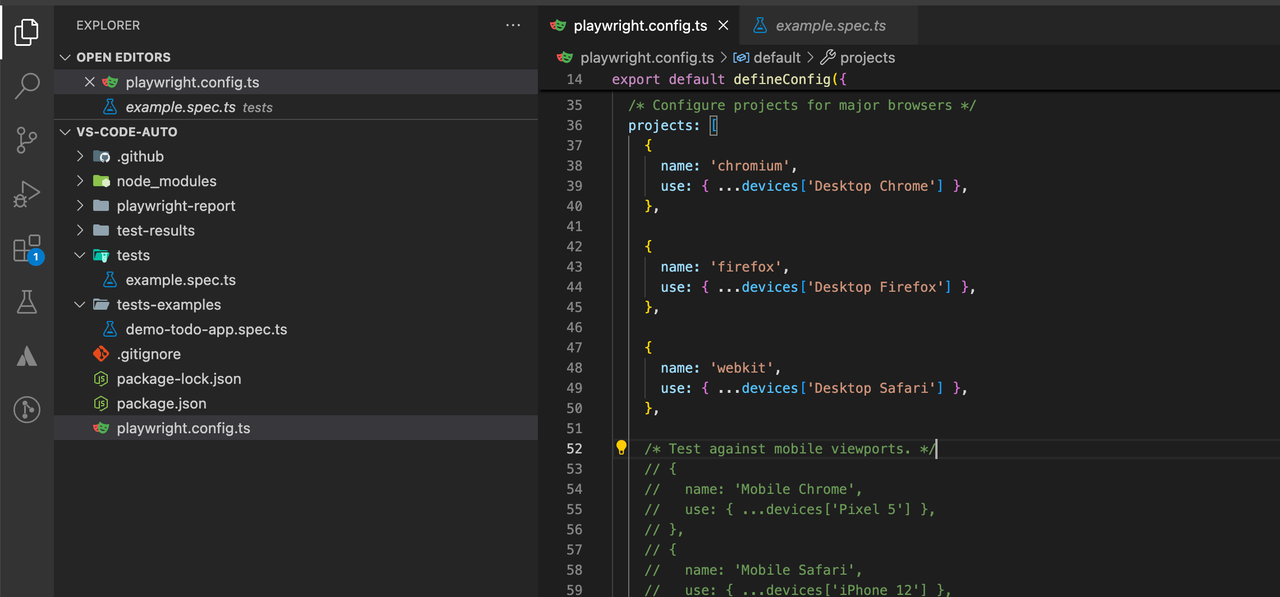
Playwright will automatically download the required browsers and generate the following files and folders:
playwright.config.ts
package.json
package-lock.json
tests/
  example.spec.ts
tests-examples/
  demo-todo-app.spec.ts
- The
playwright.config.tsfile allows you to customize the Playwright settings, including which browsers to run your tests on. - If you're installing the tool within an existing project, the necessary dependencies in this Playwright tutorial will be added directly to your existing
package.jsonfile. - The tests/ folder includes a basic example test to help you get started right away.
- For a more advanced example, check out the
tests-examples/folder, which contains tests for a sample todo app.
These files give you a solid foundation to begin writing and running your own tests with Playwright.
Method 2: Installing Playwright with Node.js
Install Playwright manually by running commands in your terminal using Node.js and npm. You need to install Node.js.
If you haven’t already, go to nodejs.org and download the latest LTS version.
Step 1: Create a project folder
Open your terminal (or command prompt) and create a new folder for your project.
mkdir {yourFolderName}
cd {yourFolderName}
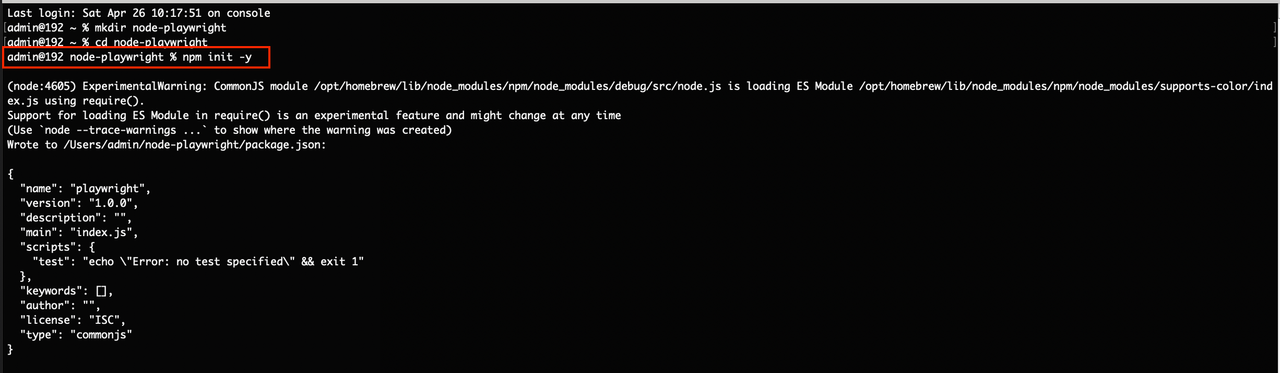
Step 2: Initialize a Node.js project
Inside your project folder, initialize a new Node.js project. This command will create a package.json file to manage your project dependencies.
npm init -y
The -y flag automatically accepts all default values. If you prefer to manually fill in details like project name, version, etc., you can omit the -y.
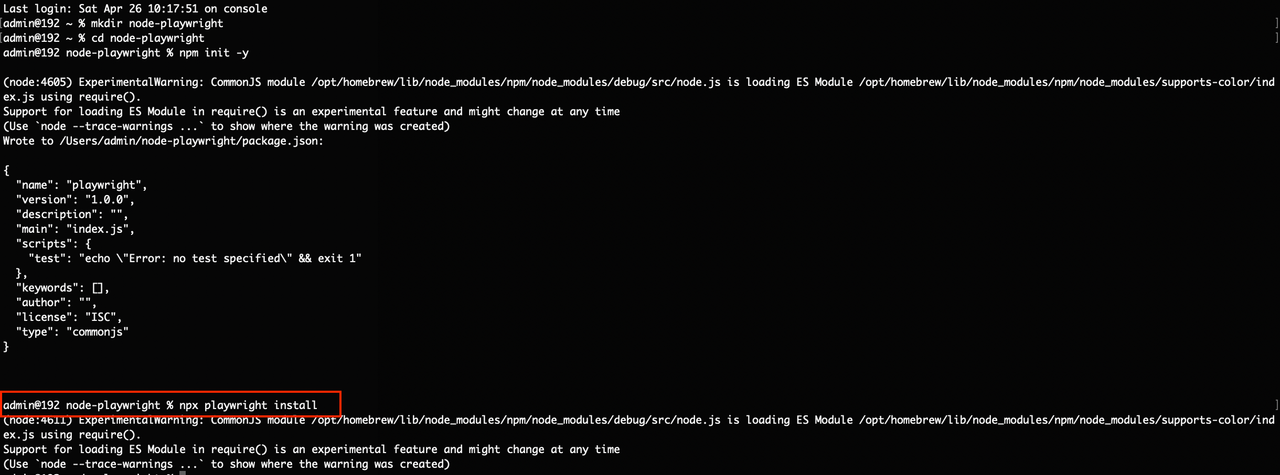
Step 3: Install Playwright
Now for the main event! Install Playwright and the necessary browsers.
npm install @playwright/test
Or
npx playwright install
npm install @playwright/test: Installs Playwright’s test runner library.npx playwright install: This is the coolest part! This command automatically downloads the required browsers (Chromium, Firefox, and WebKit) that Playwright uses for testing. You don’t need to install browsers yourself manually!
After running these commands, you’ll see friendly messages confirming that the browsers were installed successfully.
Playwright tutorial: Running tests with Playwright
Playwright’s test runner automatically detects and runs files with the following extensions: .spec.js, .spec.ts, .test.js, and .test.ts.
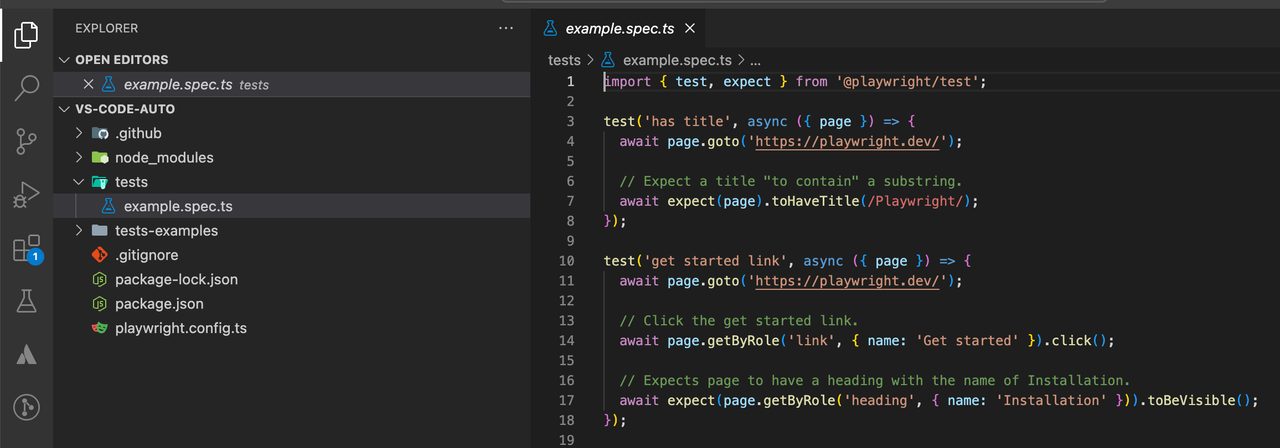
1. Run the example if you installed Playwright using the VS Code extension
Installing Playwright via the VS Code Extension automatically creates an example test file located at tests/example.spec.ts or (.js).
You can run this test to verify that your setup is working correctly.
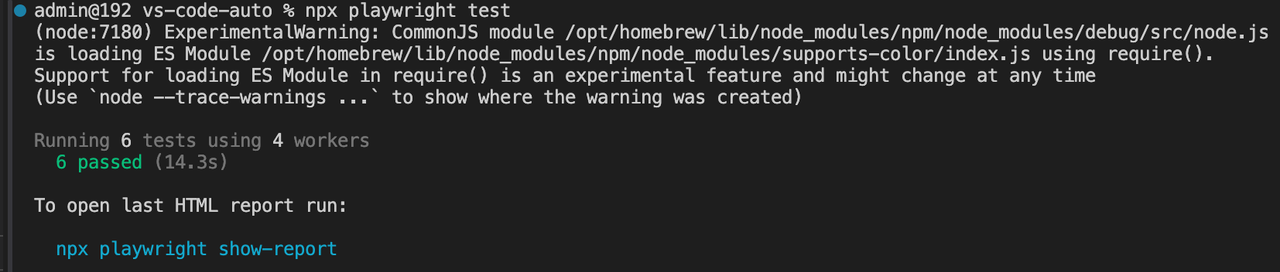
Use the following command, depending on your package manager, to run the test file:
# Using npm
npx playwright test
# Or using yarn
yarn playwright test
# Or using pnpm
pnpm exec playwright test
1.1. Headless mode
By default, tests are executed in headless mode, meaning the browser window does not open during the run. Instead, all test results and logs are output directly to the terminal.
Optionally: Run a specific test file
If you want to run a specific test file, you can do so by providing the path to the test:
npx playwright test tests/example.spec.ts
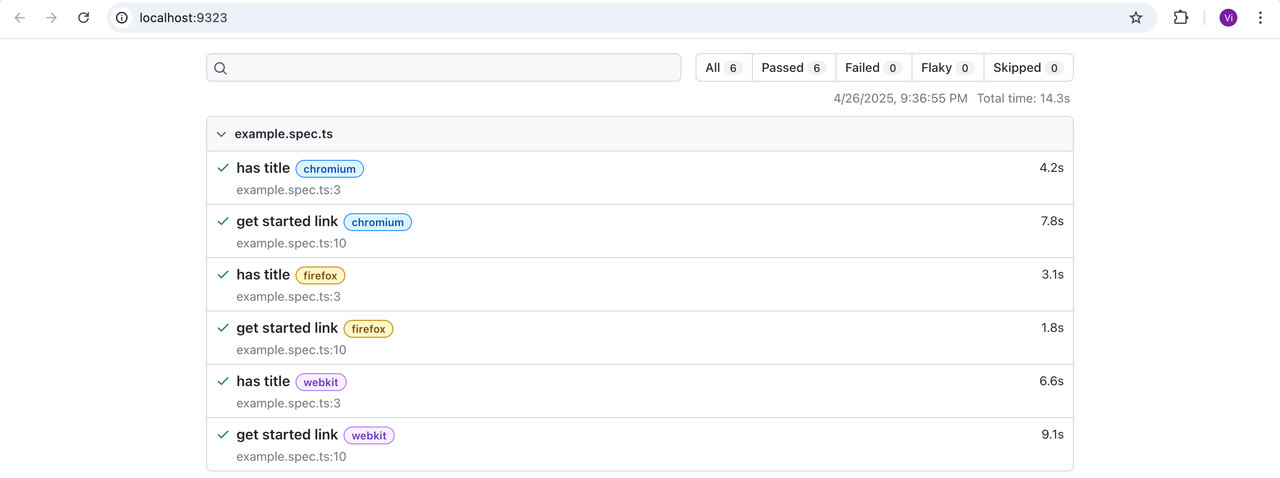
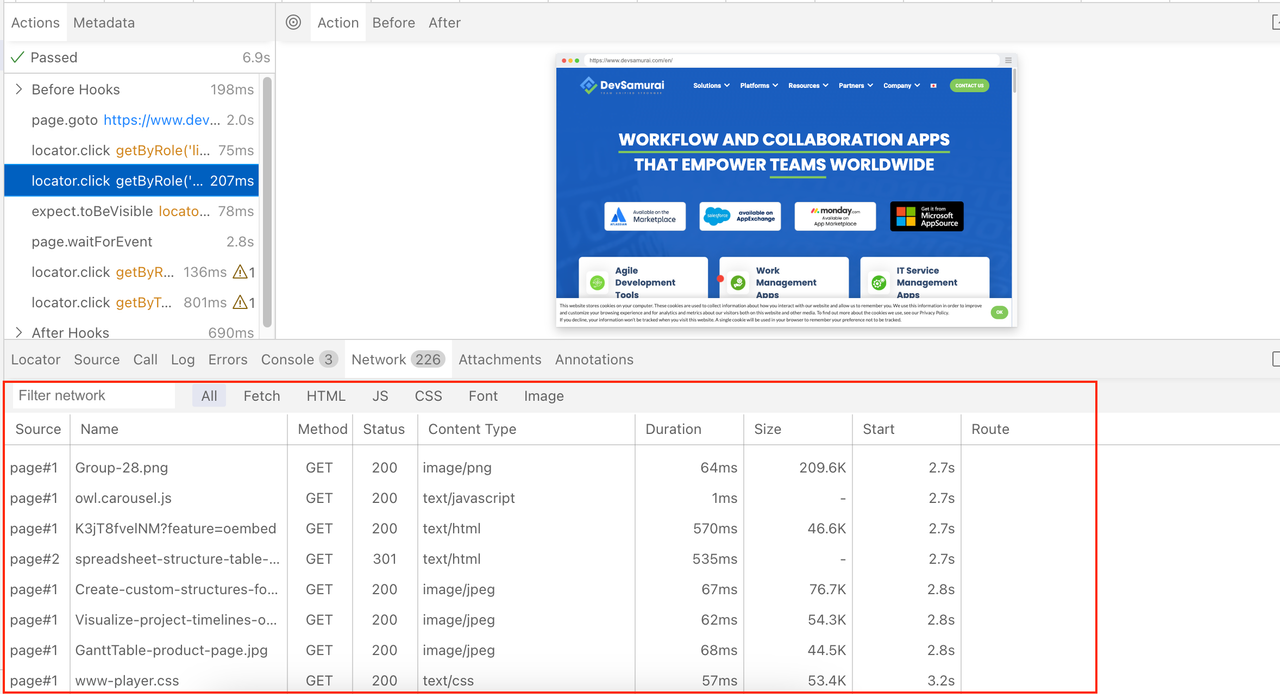
1.2. Viewing the HTML Test Report
After the test run completes (headless mode), Playwright automatically generates an HTML report. This report provides a detailed overview of your test results, allowing you to:
- Filter by browser
- View test statuses (passed, failed, skipped, flaky)
- Explore individual tests with detailed error messages and step-by-step execution logs
If any test fails, the HTML report will open automatically.
To open the test report manually, use the following command based on your package manager:
# Using npm
npx playwright show-report
# Or using yarn
yarn playwright show-report
# Or using pnpm
pnpm exec playwright show-report
Once opened, you will see a detailed visual summary of the test results, as illustrated in the example image below.
1.3. Running tests in UI mode
For a more interactive development experience — including time-travel debugging, watch mode, and enhanced visual feedback — you can run your tests in UI Mode.
Start UI Mode by running:
# Using npm
npx playwright test --ui
# Or using yarn
yarn playwright test --ui
# Or using pnpm
pnpm exec playwright test --ui
Below are some key features available in UI Mode:
a. Test List view
After launching UI Mode, you'll see a list of all test files.
- Click the triangle icon next to a file, a test block, or an individual test to run it.
- To run all tests at once, use the triangle icon at the top of the sidebar.

b. Filtering tests
You can filter tests by text, tags (@tag), status (passed, failed, skipped), or by projects defined in your playwright.config.
Note: If you are using project dependencies, make sure to run your setup tests first before running the tests that depend on them. The UI mode will not take into consideration the setup tests, and therefore, you will have to manually run them first.

c. Timeline view
The timeline shows navigation and actions with color highlights.
- Hover to preview screenshots of each step.
- Double-click an action to zoom into its timing.
- Use the slider to focus on multiple actions, filtering logs and network activity accordingly.

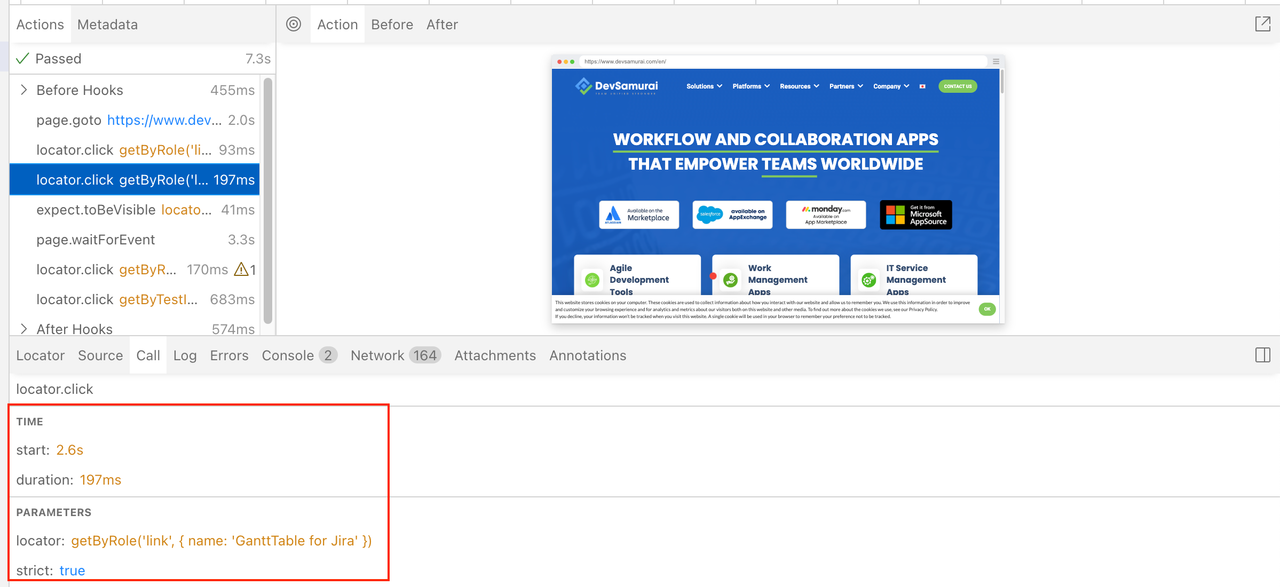
d. Actions
The Actions tab lists locators and action durations.
- Hover to preview DOM snapshots before and after actions.
- Click to inspect and debug individual actions easily.

e. Pop out DOM snapshot
You can pop out the DOM snapshot into a new window for deeper debugging.
- Inspect HTML, CSS, console logs, and network activity using DevTools.
- Compare snapshots by popping out multiple actions.

f. Pick Locator
The Pick Locator feature helps you easily find and create precise locators by visually inspecting a snapshot of the page during test execution.
This is useful for:
- Finding the best locator for an element.
- Modifying locators and verifying if they still match the correct element.
- Copying ready-to-use locators into your Playwright test code.

g. Source Panel
Hover over actions to highlight their corresponding code lines.
- Click "Open in VSCode" to jump straight to that line in your code editor.

h. Call Tab
View detailed info for each action:
- Duration, locator used, strict mode info, and key inputs.
i. Log Tab
See the internal steps Playwright takes during tests, such as scrolling into view, waiting for visibility, and performing actions.

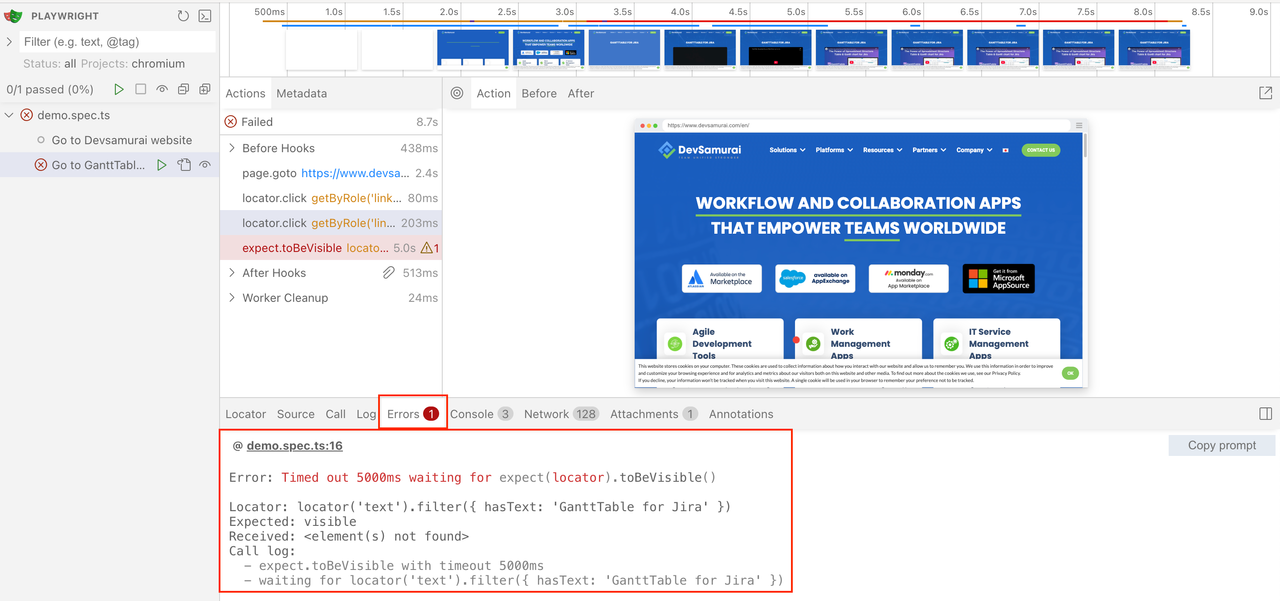
j. Errors Tab
Failed tests will show detailed error messages here.
- A red marker on the timeline indicates where the failure occurred.
- Quickly navigate to the failed source line.
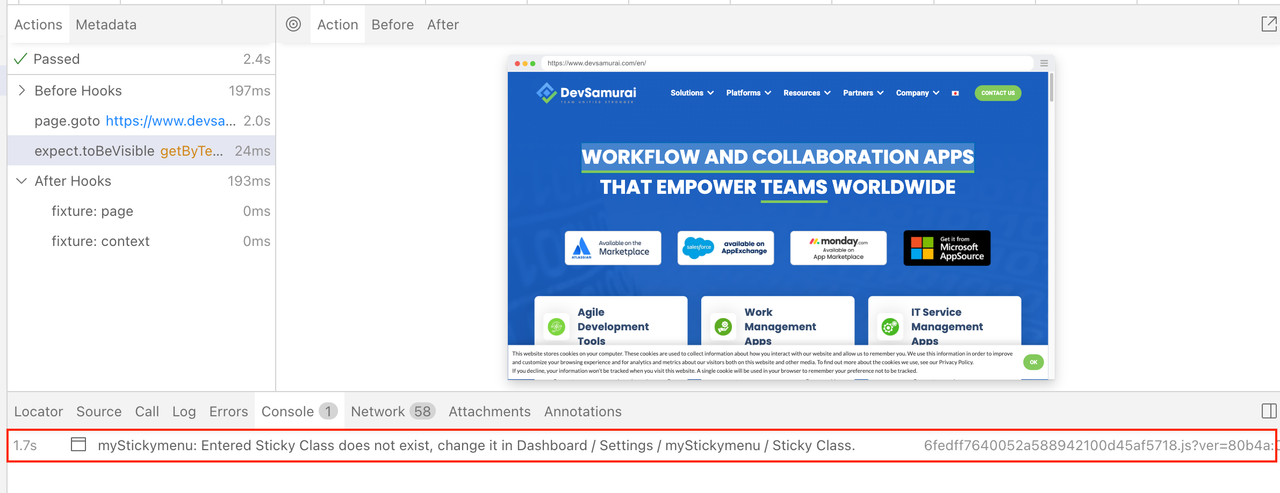
k. Console Tab
View console logs both from the browser and from your test scripts.
- Icons differentiate between browser logs and test logs.
l. Network Tab
Track all network requests made during tests.
- View headers, bodies, status codes, request types, durations, and sizes.
m. Attachments
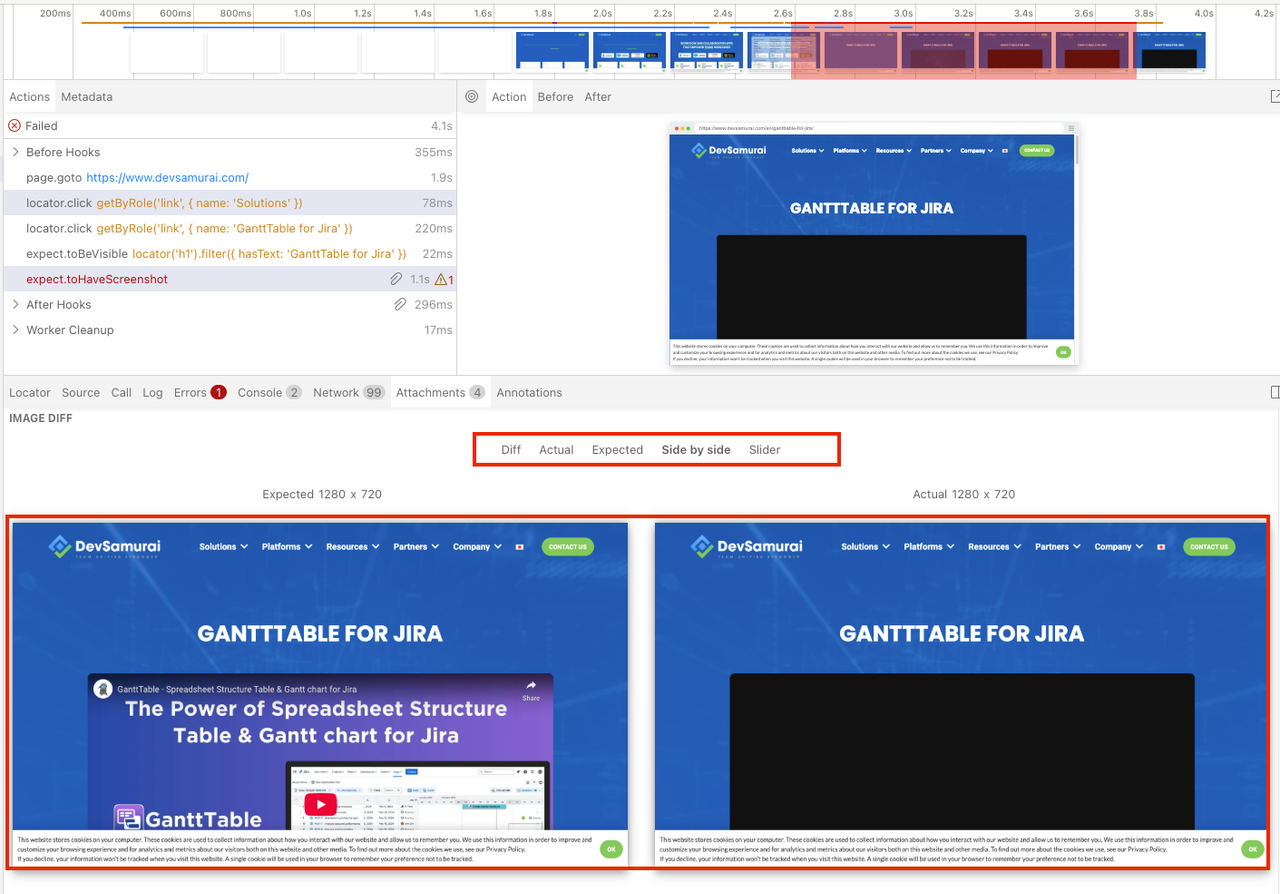
The "Attachments" tab lets you explore all the attachments generated during your tests. If you are performing visual regression testing, you can:
- Compare screenshots by reviewing the image diff, the actual image, and the expected image.
- Click on the expected image to activate a slider tool, which allows you to smoothly slide one image over the other.
- This slider helps you easily spot visual differences between your actual and expected screenshots.
🔗 Learn more about attachments and visual comparisons in Playwright: https://playwright.dev/docs/test-snapshots
2. If you installed Playwright using Node.js
🔹 Step 1: Create a test file
Create a new test file in your project folder. For example, create a file named demo.spec.ts.
You can add a simple test like this:
🔹 Step 2: Run the test
npx playwright test
Expected output:

Writing our first Playwright test
Writing tests in Playwright is simple and effective. The core principle of Playwright tests is to:
- Perform actions on web page elements.
- Assert the state of the page against expectations.
Playwright’s assertions are designed to describe the expected state that should eventually be met, meaning there’s no need to manually handle timeouts or race conditions in your tests.
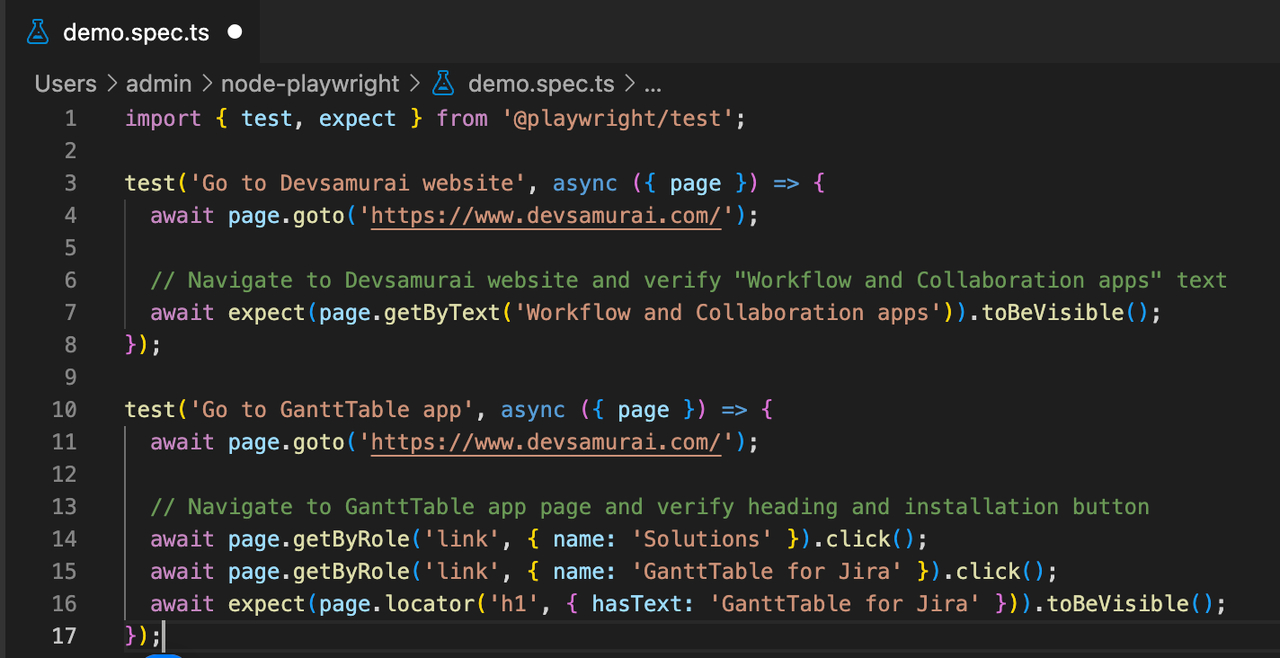
1. First test example
Let’s look at a simple example of how to write a Playwright test:
import { test, expect } from '@playwright/test';
test('Go to Devsamurai website', async ({ page }) => {
  await page.goto('https://www.devsamurai.com/');
  // Navigate to Devsamurai website and verify "Workflow and Collaboration apps" text
  await expect(page.getByText('Workflow and Collaboration apps')).toBeVisible();
  await expect(page).toHaveScreenshot();
});
test('Go to GanttTable app', async ({ page }) => {
  await page.goto('https://www.devsamurai.com/');
  // Navigate to GanttTable app page and verify heading and installation button
  await page.getByRole('link', { name: 'Solutions' }).click();
  await page.getByRole('link', { name: 'GanttTable for Jira' }).click();
  await expect(page.locator('h1', { hasText: 'GanttTable for Jira' })).toBeVisible();
  await expect(page).toHaveScreenshot();
  const page1Promise = page.waitForEvent('popup');
  await page.getByRole('link', { name: 'Try Now' }).first().click();
  const page1 = await page1Promise;
  await page1.getByTestId('app-listing__install-app-btn').click();
});
Note: Add // @ts-check at the start of each test file when using JavaScript in VS Code to get automatic type checking.
2. Key concepts for writing Playwright tests
2.1. Navigation
Most tests begin with navigating to the target URL. Playwright handles the waiting for the page to load before proceeding, so there is no need for explicit waits.
await page.goto('https://www.devsamurai.com/');
Playwright will automatically wait until the page reaches a "load" state before continuing.
2.2. Interactions
After navigating to the page, the next step is to interact with the page elements. This is done using locators, which are Playwright’s way of identifying elements on the page. Playwright waits for elements to become actionable before performing actions, meaning you don’t need to manually wait for elements to be visible or enabled.
await page.getByRole('link', { name: 'GanttTable for Jira' }).click();
Common actions in Playwright
Here are some of the most common actions you can perform on locators:
| Action | Description |
|---|---|
| locator.check() | Checks a checkbox element. |
| locator.click() | Clicks the element. |
| locator.uncheck() | Unchecks a checkbox element. |
| locator.hover() | Hover the mouse over the element. |
| locator.fill() | Fill an input field with text. |
| locator.focus() | Focus on the element. |
| locator.press() | Press a specific key on the element. |
| locator.setInputFiles() | Upload a file using the input file. |
| locator.selectOption() | Select an option from a dropdown. |
2.3. Assertions
Assertions in Playwright help validate whether an element or page matches the expected state. Playwright includes a built-in expect() function, which allows you to write assertions for various conditions.
Here’s an example:
await expect(page.locator('h1', { hasText: 'GanttTable for Jira' })).toBeVisible();
This assertion waits until the heading containing the text "GanttTable for Jira" is visible on the page.
Common Async assertions:
| Assertion | Description |
|---|---|
| expect(locator).toBeChecked() | Asserts that a checkbox is checked. |
| expect(locator).toBeEnabled() | Asserts that a control is enabled. |
| expect(locator).toBeVisible() | Asserts that an element is visible on the page. |
| expect(locator).toContainText() | Asserts that an element contains specific text. |
| expect(locator).toHaveAttribute() | Asserts that an element has a specific attribute. |
| expect(locator).toHaveCount() | Asserts that a list of elements has a given length. |
| expect(locator).toHaveText() | Asserts that an element contains a specific text. |
| expect(locator).toHaveValue() | Asserts that an input element has a given value. |
| expect(page).toHaveTitle() | Asserts that the page title matches. |
| expect(page).toHaveURL() | Asserts that the page URL matches. |
These assertions ensure that the elements are in the expected state before continuing with the test.
2.4. Test isolation
Playwright test uses test fixtures for isolation. Each test gets a clean, isolated environment provided by a Browser Context, which behaves like a new browser profile for each test. This ensures that tests do not interfere with each other.
import { test } from '@playwright/test';
test('example test', async ({ page }) => {
  // "page" belongs to an isolated BrowserContext, created for this specific test.
});
test('another test', async ({ page }) => {
  // "page" in this second test is completely isolated from the first test.
});
Each test will have its own isolated page, even if multiple tests are running in a single browser.
2.5. Using test hooks
Playwright supports test hooks to set up and tear down tests. You can group tests using test.describe, and run setup and teardown functions with test.beforeEach and test.afterEach.
For example:
test.describe('Navigation Tests', () => {
  test.beforeEach(async ({ page }) => {
    // Go to the starting URL before each test
    await page.goto('https://www.devsamurai.com/');
  });
  test('Main navigation', async ({ page }) => {
    // Assert that the page URL contains 'Devsamurai'
    await expect(page).toHaveURL('Devsamurai');
  });
});
Test Hooks Explained:
- test.describe() – Groups tests for better organization.
- test.beforeEach() – Runs before each test in the group to set up necessary conditions (e.g., navigating to the URL).
- test.afterEach() – Runs after each test in the group to clean up resources.
- test.beforeAll() – Runs once before all tests in the file.
- test.afterAll() – Runs once after all tests in the file.
Playwright Tutorial: Locators - Your GPS for the web
Locators are fundamental in Playwright. They are the only way to reliably interact with elements on a web page. Playwright is designed around the principle that your tests should be resilient, meaning they should keep working even when the page's structure or styling changes slightly.
To achieve this, Playwright provides built-in locators that are stable, powerful, and easy to use.
1. Several common and recommended locator strategies
1.1. page.getByRole()
Role locators include various elements like buttons, checkboxes, headings, links, lists, tables, and more, and they adhere to W3C specifications for ARIA roles, ARIA attributes, and accessible names. Many HTML elements, such as <button>, have an implicitly defined role that the role locator can detect.
- Important note: While role locators provide early feedback on ARIA guidelines, they do not replace accessibility audits or conformance tests.
- When to use role locators: Prioritize them as they align with how users and assistive technologies perceive the page, offering a close match to the user experience.
")
Example:
await page.getByRole('link', { name: 'GanttTable for Jira' }).click();
1.2. page.getByText()
Finds elements that contain a specific text string.
Note: Matching by text automatically normalizes whitespace — multiple spaces are treated as one, line breaks are converted to spaces, and leading/trailing whitespace is ignored, even with exact matching.
When to use text locators: Use text locators primarily for non-interactive elements like <div>, <span>, <p>, etc. For interactive elements such as <button>, <a>, <input>, etc., prefer using role locators for better accuracy and clarity.
")
Example:
await page.getByText('Workflow and Collaboration').click();
1.3. page.getByLabel()
Targets form elements based on the text of their associated label, making tests more accessible and stable.
When to use label locators: Use label locators when targeting form fields that are associated with visible text labels.
")
Example:
await page.getByLabel('Name your portfolio').fill('My Portfolio Name');
1.4. page.getByPlaceholder()
Identifies input fields by matching their placeholder text.
When to use placeholder locators: Use placeholder locators when form elements lack labels but have meaningful placeholder text instead.
")
Example:
await page.getByPlaceholder('name@example.com').fill('username');
1.5. page.getByAltText()
Selects elements — typically images — based on their alt text attribute, supporting accessible image testing.
When to use alt text locators: Use alt text locators when working with elements like <img> and <area> that provide descriptive alt attributes.
")
Example:
await page.getByAltText('Devsamurai').click();
1.6. page.getByTitle()
Finds elements by matching the value of their title attribute.
When to use title locators: Use title locators when your target elements include a title attribute that can be reliably used for identification.
")
Example:
await page.getByTitle('DevSamurai on Atlassian').first();
1.7. page.getByTestId()
Locates elements based on a custom data-testid attribute. This approach is highly resilient, as tests remain stable even if the element’s role or visible text changes.
However, since data-testid is not user-facing, use role or text locators if validating user-visible content is important to you.
")
Example:
await page.getByTestId('app-header__app-name');
1.8. page.locator(selector)
A general-purpose locator that uses CSS or XPath selectors. It's best used as a fallback when semantic locators aren't suitable, though be cautious as it may be more fragile with page structure changes.
Example:
")
- What is a CSS Locator?
A CSS locator uses CSS selectors — the same ones you use in stylesheets — to locate elements.
Examples:
page.locator('button')                // finds all <button> elements
page.locator('#submit')              // finds element with id="submit"
page.locator('input[name="email"]')  // finds <input> where name="email"
- What is an XPath Locator?
An XPath locator uses XML path expressions to find elements based on their hierarchy and attributes.
Examples:
page.locator('//button')                           // all <button> elements
page.locator('//*[@id="submit"]')                 // element with id="submit"
page.locator('//input[@name="email"]')            // <input> where name="email"
- When to use what?
| Locator type | Pros | Cons |
|---|---|---|
| CSS | Fast, readable, and clean | Can't navigate up the DOM tree |
| XPath | More powerful and flexible | Less readable, sometimes slower |
2. Working with Frames and Shadow DOM
Playwright automatically supports Shadow DOM (except for XPath locators). For iframe interaction, wait until the iframe is attached before accessing its content.
const iframeLocator = page.locator('[data-testid="hosted-resources-iframe"]');

await expect(contentFrame.getByRole('heading', { name: 'GanttTable' })).toBeVisible();
await contentFrame.getByRole('heading', { name: 'GanttTable' }).click();
3. Filtering locators
Locators can be filtered by text with the locator.filter() method. It will search for a particular string somewhere inside the element, possibly in a descendant element, case-insensitively.

You can also pass a regular expression. You can refine locators by:
3.1. Text inside
await page.getByRole('listitem')
  .filter({ hasText: 'GanttTable' })
  .getByRole('button', { name: 'Try out' })
  .click();
3.2. Not containing text
await expect(
  page.getByRole('listitem').filter({ hasNotText: 'GanttTable' })
).toHaveCount(2);
3.3. By child/descendant element
You can filter locators to include or exclude elements based on whether they contain a specific child element, such as one found by getByRole, getByText, or getByTestId
await page.getByRole('listitem')
  .filter({ has: page.getByRole('heading', { name: 'Timeplanner' }) })
  .getByRole('button', { name: 'Try out' })
  .click();
4. Locator Operators
4.1. Chain locators
You can chain locator methods like getByRole() or getByText() to narrow down a search within a specific element:
// Select the list item containing "GanttTable" and click its button

const product = page.getByRole('listitem').filter({ hasText: 'GanttTable' });
await product.getByRole('button', { name: 'Try out' }).click();
4.2. Matching multiple conditions (and())
Use .and() to match an element with multiple attributes:
// Example combining locators with 'and'

const tryOutButton = page.getByRole('button').and(page.getByTitle('Try out this product'));
4.3. Matching alternatives (or())
Use .or() to match any one of multiple locators. Use .first() if both match to avoid strict mode violations:
// Example combining alternative locators with 'or'

const ganttHeading = page.getByRole('heading', { name: 'GanttTable' });
const timeplannerDialog = page.getByText('Timeplanner Details');
await expect(ganttHeading.or(timeplannerDialog).first()).toBeVisible();
Playwright's superpowers: Codegen, Tracing, and Auto-waits
1. Generate tests with the Playwright Inspector
1.1. Overview
Playwright includes a built-in test generator (codegen) that helps you:
- Record user actions as test scripts
- Automatically generate resilient locators
- Save time when starting test automation
1.2. How to use the test generator
a. Run Codegen
npx playwright codegen
// Example: Navigate to devsamurai.com
npx playwright codegen devsamurai.com
Opens two windows:
- Browser window: for interaction
- Playwright Inspector: for recorded actions, code preview, and locator generation
You can run it with or without a URL and navigate manually in the browser.

b. Record a test
Start by running the codegen command and interacting with the browser window. Playwright will automatically generate the corresponding test code when you perform actions like clicking or filling in fields.
The test generator intelligently analyzes the rendered page to select the most suitable locator, giving priority to role, text, and test ID selectors.
c. Assertions (Optional Actions in Toolbar)
You can assert:
- Visibility: 'assert visibility' → element is visible
- Text Content: 'assert text' → element contains expected text
- Value: 'assert value' → input/field holds specific value
")
d. Toolbar features
-
Pick Locator:
- Once you're done recording, click the 'Record' button to stop. This will reveal the 'Pick Locator' button.
- Click 'Pick Locator', then hover over elements in the browser window. Playwright will highlight the locator associated with each element in real-time.
- Click on the element you want to locate, and its locator code will appear in the Locator Playground. You can edit the locator there to fine-tune it, and the matching element will remain highlighted in the browser.
- You can 'Copy' button to copy the locator and paste it into your test code.
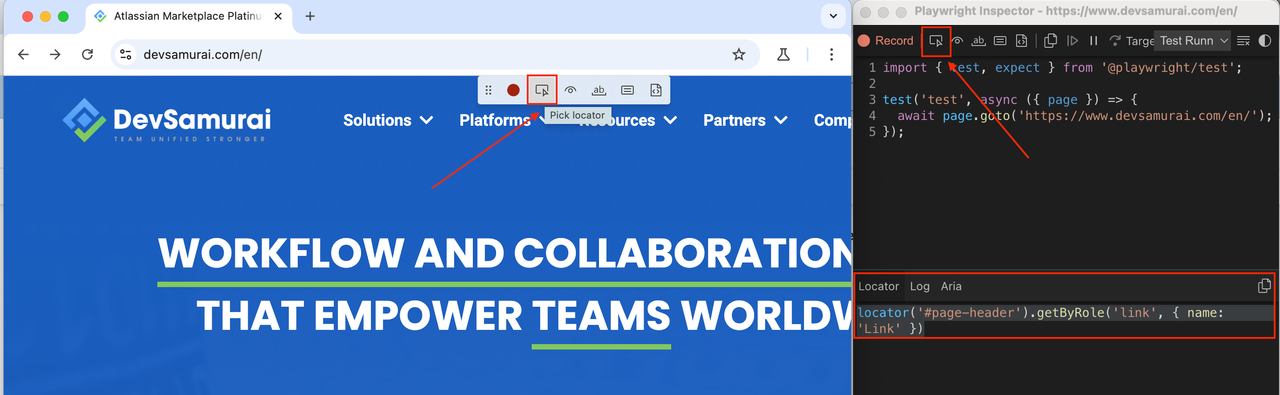
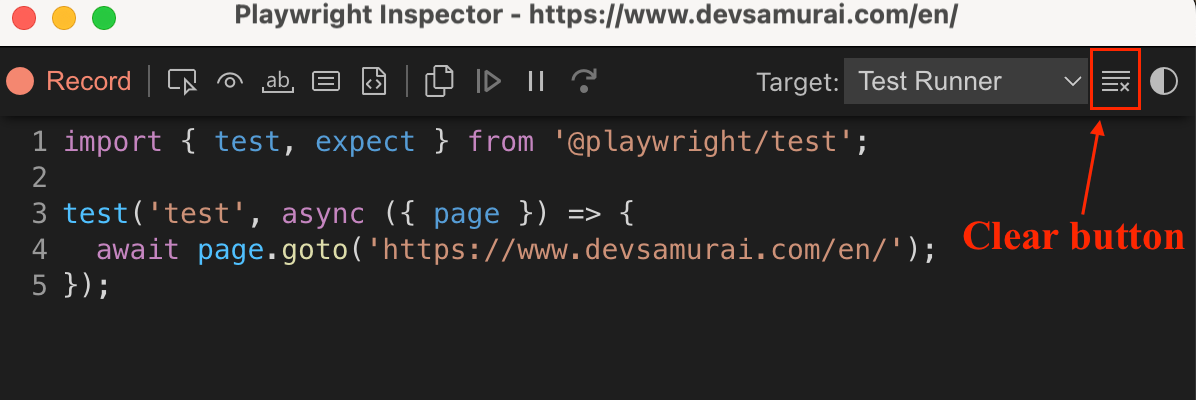
- Clear: You can clear the code to start recording again. Once finished, close the Playwright inspector window or stop the terminal command.
1.3. Emulation support
The Playwright test generator can simulate:
a. Devices (mobile, tablet, etc.)
You can record scripts and tests while simulating a mobile device using the --device option, which automatically configures the viewport, user agent, and other relevant settings.
npx playwright codegen --device="iPhone 13" www.devsamurai.com

b. Viewports
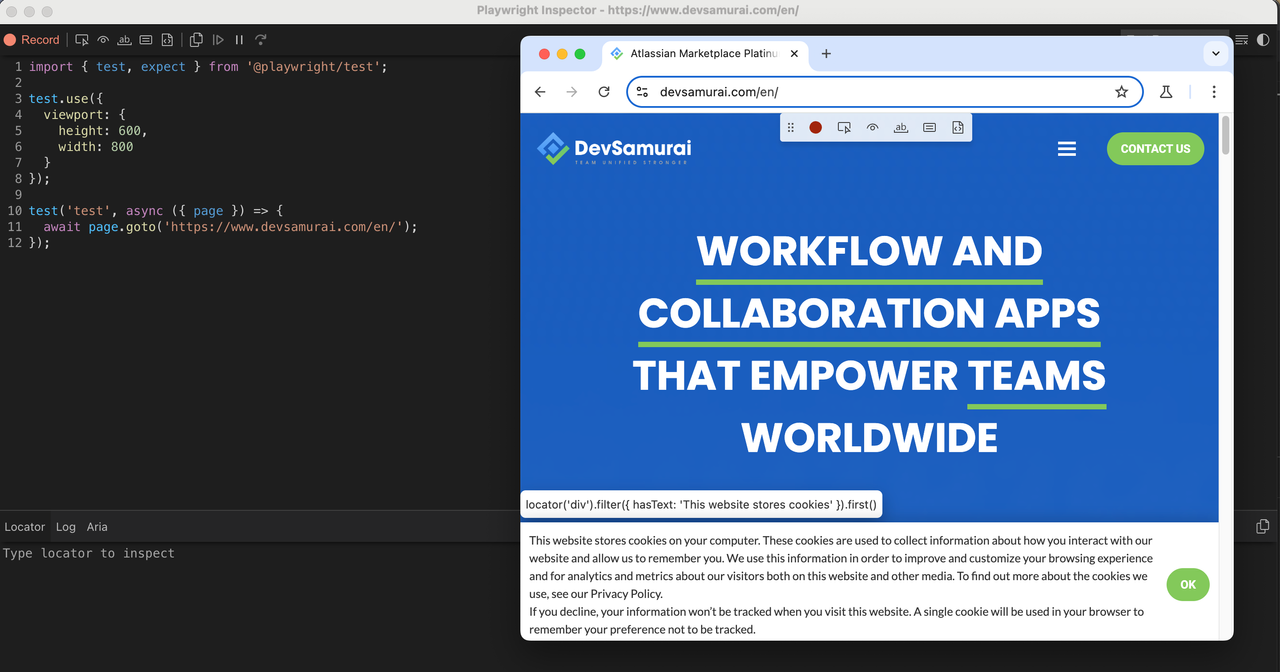
The Playwright tool opens a browser window with a fixed viewport size rather than a responsive design, allowing tests to be conducted under consistent conditions. To generate tests with a different viewport size, you can use the --viewport option.
npx playwright codegen --viewport-size="800,600" devsamurai.com
c. Geolocation, language, timezone
You can record scripts and tests while emulating timezone, language, and location using the --timezone, --geolocation, and --lang options.
Once the browser window opens:
- Accept the cookies.
- Click the "Locate me" button at the top right to observe geolocation in action.
npx playwright codegen https://example.com --timezone="Europe/Paris" --geolocation="48.8566,2.3522" --lang="fr-FR"

1.4. Authenticated session states
a. Record login session
Use --save-storage=auth.json when running codegen to save cookies, localStorage, and IndexedDB after login:
npx playwright codegen 'https://marketplace.atlassian.com/search?query=devsamurai' --save-storage=auth.json
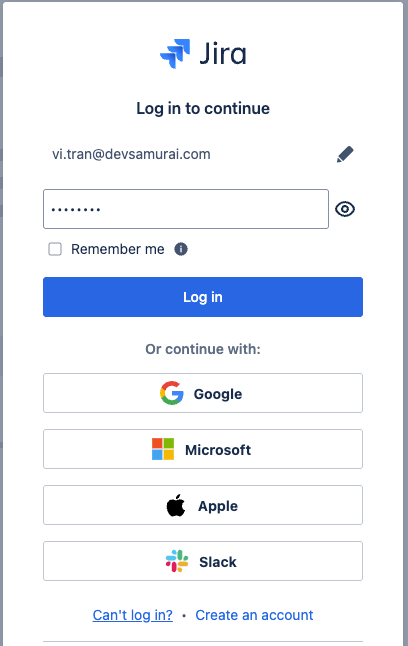
After running the command, a browser window and the Playwright Inspector will open. In the browser, click the "Sign in" or "Log in" button to begin the authentication process.

After logging in, and thebrowser closes, the file auth.json will store all authentication-related information.
⚠️ Security Reminder: Make sure you only use the auth.json locally, as it contains sensitive information. Add it to your .gitignore or delete it once you have finished generating your tests.
b. Reuse authenticated state
Use --load-storage=auth.json to reload the saved state and skip the login step:
npx playwright codegen "https://marketplace.atlassian.com/search?query=devsamurai" --load-storage=auth.json

This resumes the session in a logged-in state, letting you generate tests directly as an authenticated user.
2. Trace viewer
2.1. What is it?
Playwright’s Trace Viewer is a visual debugging tool that explores recorded test traces. It's especially useful for understanding failed tests in CI environments.
2.2. How to open a trace
You can open a saved trace using the Playwright CLI. Replace path/to/trace.zip with the actual path to your trace file.
npx playwright show-trace path/to/trace.zip
In Browser: Or, you can go to trace.playwright.dev and drag/drop your .zip file or paste a URL to view a remote trace. No data is uploaded — everything runs in your browser.
2.3. Recording a trace
On CI: In playwright.config.ts, enable tracing only on test retries:
use: { trace: 'on-first-retry', }
Other options include:
- 'on-first-retry': Record a trace only when retrying a test for the first time.
- 'on-all-retries': Record traces for all test retries.
- 'on': Trace every test (slower)
- 'retain-on-failure': Keep traces only for failed tests
- 'off': Disable tracing

Locally: To record a trace during development mode, set the --trace flag to on when running your tests
npx playwright test --trace on
This command does two things:
- Runs your test
- Saves a trace.zip file for each test in the .playwright folder

You can then open the HTML report and click on the trace icon to open the trace.
npx playwright show-report

2.4. Trace viewer features
- Actions: See each step (click, type, etc.) with before/after DOM snapshots
- Screenshots & Snapshots: Visual timeline for each action
- Source Code: Highlights test code for each step
- Logs & Errors: Console output, error messages, and test logs
- Network: Full details of all network requests
- Metadata: Test environment info (browser, viewport, duration)
- Attachments: Visual diff tools for image comparisons
3. Auto-waits
3.1. Introduction
Playwright performs a series of actionability checks on elements before executing actions to ensure those actions behave reliably. It automatically waits for all relevant checks to pass before proceeding. If the checks do not pass within the specified timeout, the action fails with a TimeoutError.
Example: locator.click()
Before performing a click(), Playwright ensures that:
- The locator resolves to exactly one element
- The element is visible
- The element is stable (not animating)
- The element can receive events (not covered by another element)
- The element is enabled
3.2. Actionability checks table
| Action | Visible | Stable | Receives Events | Enabled | Editable |
|---|---|---|---|---|---|
| locator.check() | Yes | Yes | Yes | Yes | - |
| locator.click() | Yes | Yes | Yes | Yes | - |
| locator.dblclick() | Yes | Yes | Yes | Yes | - |
| locator.setChecked() | Yes | Yes | Yes | Yes | - |
| locator.tap() | Yes | Yes | Yes | Yes | - |
| locator.uncheck() | Yes | Yes | Yes | Yes | - |
| locator.hover() | Yes | Yes | Yes | - | - |
| locator.dragTo() | Yes | Yes | Yes | - | - |
| locator.screenshot() | Yes | Yes | - | - | - |
| locator.fill() | Yes | - | - | Yes | Yes |
| locator.clear() | Yes | - | - | Yes | Yes |
| locator.selectOption() | Yes | - | - | Yes | - |
| locator.selectText() | Yes | - | - | - | - |
| locator.scrollIntoViewIfNeeded() | - | Yes | - | - | - |
| locator.blur() | - | - | - | - | - |
| locator.dispatchEvent() | - | - | - | - | - |
| locator.focus() | - | - | - | - | - |
| locator.press() | - | - | - | - | - |
| locator.pressSequentially() | - | - | - | - | - |
| locator.setInputFiles() | - | - | - | - | - |
3.3. Forcing actions
Some actions, like locator.click(), support a force option that disables non-essential actionability checks. For example, using force: true will skip the check for whether the element can receive events at the action point.
3.4. Assertions
Playwright also includes auto-retrying assertions, which help eliminate flakiness by waiting until the expected condition is met, just like it auto-waits before actions.
3.5. Definitions
a. Visible
An element is considered visible if it has a non-empty bounding box and its computed style does not include visibility: hidden.
Notes:
- Elements with display: none or 0 width/height are not visible.
- Elements with opacity: 0 are still considered visible.
b. Stable
An element is stable if it maintains the same bounding box across at least two animation frames (i.e., it is not moving or animating).
c. Enabled
An element is enabled if it does not meet any conditions for being disabled. It is considered disabled if:
- It is a <button>, <select>, <input>, <textarea>, <option>, or <optgroup> with the disabled attribute;
- It is a descendant of a <fieldset> with the disabled attribute;
- It has the attribute
[aria-disabled="true"].
d. Editable
An element is editable if it is enabled and not readonly.
An element is readonly if:
- It is a <select>, <input>, or <textarea> with the readonly attribute;
- It has the
[aria-readonly="true"]attribute and its role supports it.
e. Receives events
An element can receive pointer events if it is the topmost element at the action point. For example, when clicking at coordinates (10, 10), Playwright checks whether the element at that point is the one being targeted, or if something else (like an overlay) is capturing the event.
f. Example scenario
Example: Clicking a "Sign Up" Button After Validation
Let's say you have a sign-up form where the "Sign Up" button is initially disabled until the system validates that the username is unique.
Playwright will auto-wait for:
- The button to become enabled
- The button is to be visible
- The button is to receive pointer events
You don’t need to manually wait for the server response or the button to become enabled. Then, it will proceed with the click.
Fixtures
1. Introduce Playwright test fixtures
Playwright Test utilizes the concept of test fixtures to establish isolated environments for each test. Fixtures provide tests with the necessary resources while ensuring no interference between them. This approach allows for grouping tests based on their purpose rather than shared setup.
2. Benefits of using fixtures
- Encapsulation: Fixtures bundle setup and teardown logic in one place, making code easier to manage.
- Reusability: Fixtures can be defined once and used across multiple test files, similar to Playwright's built-in page fixture.
- On-Demand Setup: Only the fixtures required by a specific test or hook are initialized.
- Composability: Fixtures can depend on each other to create complex configurations.
- Flexibility: Tests can use various combinations of fixtures to tailor their environment without affecting other tests.
- Simplified Grouping: You can group tests by their meaning instead of by common setup procedures.
3. Built-in fixtures
Playwright provides several core fixtures out of the box:
4. Using built-in fixtures
From this example (Part 6 of this document), you can try using Built-in Fixtures:
- Extract the common setup (navigating to the Devsamurai website) into a fixture.
- Reuse this fixture across multiple tests.
- Keep the code clean, maintainable, and scalable.
✅ Step 1: Create a custom fixture
Create a file named: devsamurai-fixture.ts
import { test as base, expect, Page } from '@playwright/test';
type MyFixtures = {
  devsamuraiPage: Page;
};
export const test = base.extend<MyFixtures>({
  devsamuraiPage: async ({ page }, use) => {
    // Navigate to Devsamurai website
    await page.goto('https://www.devsamurai.com/');
    // Pass the prepared page to the test
    await use(page);
    // Teardown (if needed) can be added here
    await page.close();
  },
});
export { expect } from '@playwright/test';
✅ Step 2: Use the fixture in tests
Create a file named: devsamurai.spec.ts
import { test, expect } from './devsamurai-fixture';
test('Verify Devsamurai homepage content', async ({ devsamuraiPage }) => {
  await expect(devsamuraiPage).toHaveScreenshot();
  await expect(devsamuraiPage.getByText('Workflow and Collaboration apps')).toBeVisible();
});
test('Navigate to GanttTable app page and install', async ({ devsamuraiPage }) => {
  await devsamuraiPage.getByRole('link', { name: 'Solutions' }).click();
  await devsamuraiPage.getByRole('link', { name: 'GanttTable for Jira' }).click();
  await expect(devsamuraiPage.locator('h1', { hasText: 'GanttTable for Jira' })).toBeVisible();
  await expect(devsamuraiPage).toHaveScreenshot();
  const popupPromise = devsamuraiPage.waitForEvent('popup');
  await devsamuraiPage.getByRole('link', { name: 'Try Now' }).first().click();
  const popup = await popupPromise;
  await popup.getByTestId('app-listing__install-app-btn').click();
});
Explanation
| Component | Role |
|---|---|
| devsamuraiPage fixture | Provides a Page instance already navigated to https://www.devsamurai.com/ |
| test.extend() | Creates a custom version of the test that includes the new fixture |
| await use(page) | Runs the test with the prepared page; optional teardown comes after |
| Fixture extraction | Keeps test code DRY (Don’t Repeat Yourself) and easier to maintain |
To use a custom fixture, simply include it as an argument in your test function. Playwright will handle its setup and teardown.
5. Overriding fixtures
Instead of overriding the page to add a baseURL, we will override a custom fixture to add a specific action before it's used.
import { test as base, expect, Page } from '@playwright/test';
type DevsamuraiFixtures = {
  loggedInPage: Page;
};
const test = base.extend<DevsamuraiFixtures>({
  loggedInPage: async ({ page }, use) => {
    await page.goto('https://www.devsamurai.com/login');
    await page.fill('#username', 'testuser');
    await page.fill('#password', 'password');
    await page.click('#login-button');
    await use(page);
    // [Optional] Teardown after the test
  },
});
test('Check after login', async ({ loggedInPage }) => {
  await expect(loggedInPage.locator('.dashboard')).toBeVisible();
});
Explanation: We create a new fixture called loggedInPage based on the page fixture. The loggedInPage fixture performs login steps before providing the page to the test. The test case Check after login uses loggedInPage to have an already logged-in page.
6. Worker-scoped fixtures
We will create a worker-scoped fixture to initialize a shared environment variable.
import { test as base } from '@playwright/test';
type WorkerData = {
  apiEndpoint: string;
};
export const test = base.extend<{}, WorkerData>({
  apiEndpoint: [async ({}, use) => {
    const endpoint = 'https://api.devsamurai.com/v1';
    await use(endpoint);
    console.log('Worker finished.');
  }, { scope: 'worker' }],
});
test('Test 1 uses API endpoint', async ({ apiEndpoint }) => {
  console.log(`Test 1 calls API at: ${apiEndpoint}/data1`);
  // ... API call
});
test('Test 2 uses the same API endpoint', async ({ apiEndpoint }) => {
  console.log(`Test 2 calls API at: ${apiEndpoint}/data2`);
  // ... API call
});
Explanation: The apiEndpoint is a worker-scoped fixture. The value of the apiEndpoint is initialized once per worker and is shared by all tests within that worker.
7. Automatic fixtures
We will create an automatic fixture to log the title of each test case.
import { test as base, TestInfo } from '@playwright/test';
export const test = base.extend<{ logTitle: void }>({
  logTitle: [async ({}, use, testInfo: TestInfo) => {
    console.log(`Starting test: ${testInfo.title}`);
    await use();
    console.log(`Finishing test: ${testInfo.title}`);
  }, { auto: true }],
});
test('Test automatically logs title 1', async ({ page }) => {
  await page.goto('https://www.devsamurai.com/');
  await expect(page).toHaveScreenshot();
});
test('Test automatically logs title 2', async ({ page }) => {
  await page.getByText('Solutions').click();
});
Explanation: logTitle is an automatic fixture. It will automatically run before and after each test case to log the title without needing to be declared in the test parameters.
8. Fixture timeout
We will set a separate timeout for a fixture with a long setup time.
import { test as base, expect } from '@playwright/test';
const test = base.extend<{ slowFixture: string }>({
  slowFixture: [async ({}, use) => {
    // ... perform a slow operation ...
    await use('hello');
  }, { timeout: 60000 }]
});
test('example test', async ({ slowFixture }) => {
  // ...
});
Explanation: The slowFixture is a custom fixture defined using test.extend(). It has its own specific timeout set to 60000 milliseconds (60 seconds) using the { timeout: 60000 } option in the fixture definition.
9. Fixture options
We will create an option fixture to configure the website language.
import { test as base } from '@playwright/test';
export type MyOptions = {
  language: 'en' | 'vi';
};
export const test = base.extend<MyOptions>({
  language: ['en', { option: true }], // Default value is 'en'
});
test('Test with language option', async ({ page, language }) => {
  console.log(`Current language: ${language}`);
  await page.goto(`https://www.devsamurai.com/${language}`);
  await expect(page.locator('html')).toHaveAttribute('lang', language);
});
Explanation: language is an option fixture with a default value of 'en'. Users can change this value in playwright.config.ts. The test case uses the language value to navigate to the website with the corresponding language.
10. Combining custom fixtures from multiple modules
We will combine two simple fixtures from two different files.
Create a fixture1.ts file:
import { test as base1 } from '@playwright/test';
export const test1 = base1.extend<{ theme: string }>({
  theme: async ({}, use) => {
    await use('light');
  },
});
Create a fixture2.ts file:
import { test as base2 } from '@playwright/test';
export const test2 = base2.extend<{ version: string }>({
  version: async ({}, use) => {
    await use('1.0');
  },
});
Create a combined-fixtures.ts file:
import { mergeTests } from '@playwright/test';
import { test1 } from './fixture1';
import { test2 } from './fixture2';
export const test = mergeTests(test1, test2);
// my-test.spec.ts
import { test, expect } from './combined-fixtures';
test('Test combining fixtures', async ({ theme, version }) => {
  console.log(`Theme: ${theme}, Version: ${version}`);
  expect(theme).toBe('light');
  expect(version).toBe('1.0');
});
Explanation: test1 defines the theme fixture. test2 defines the version fixture. mergeTests combines test1 and test2 to create a new test with both fixtures.
11. Box fixtures
We will box a fixture that performs a minor auxiliary action that is unimportant in the report.
import { test as base } from '@playwright/test';
export const test = base.extend({
  logStep: [async ({}, use) => {
    console.log('Performing an auxiliary step...');
    await use();
  }, { box: true }],
});
test('Test with boxed fixture', async ({ logStep, page }) => {
  await page.goto('https://www.devsamurai.com/');
  await expect(page).toHaveScreenshot();
});
Explanation: The logStep fixture is boxed, so the "Performing an auxiliary step..." step will not be displayed in detail in the report.
12. Custom fixture title
We will set a custom title for an important fixture.
import { test as base } from '@playwright/test';
export const test = base.extend({
  apiClient: [async ({}, use) => {
    const client = { call: (url: string) => console.log(`Calling API: ${url}`) };
    await use(client);
  }, { title: 'API Client' }],
});
Explanation: The apiClient fixture will be displayed with the title "API Client" in the report instead of "apiClient".
13. Adding Global beforeEach/afterEach Hooks
We will create a global beforeEach hook to log the URL before each test.
Create a for-each-fixture.ts file:
import { test as base } from '@playwright/test';
export const test = base.extend<{ forEachTest: void }>({
  forEachTest: [async ({ page }, use) => {
    // This code runs before every test.
    await page.goto('https://www.google.com/');
    await use();
    // This code runs after every test.
    console.log('Last URL:', page.url());
  }, { auto: true }],  // automatically starts for every test.
});
Create a mytest.spec.ts file:
import { test } from './for-each-fixture.ts';
import { expect } from '@playwright/test';
test('basic', async ({ page }) => {
  expect(page).toHaveURL('https://www.google.com/');
  await page.goto('https://www.devsamurai.com/');
});
Explanation:
- We create a "setup" function (forEachTest) that runs before each test. This function goes to Google.
- We tell Playwright to run this setup function automatically for every test.
- In our test, we check that the page is initially on Google (because of the setup), and then we navigate to Devsamurai.
14. Adding Global beforeAll/afterAll Hooks
test.beforeAll() and test.afterAll() run once before or after all tests in the same file (or within the same test.describe() block). If you want hooks to run once for all tests across multiple files, you should define them as auto fixtures with scope: 'worker', like this:
Create a global-setup-teardown.ts file:
import { test as base } from '@playwright/test';
export const test = base.extend<{}, { logWorkerInfo: void }>({
  logWorkerInfo: [async ({}, use, workerInfo) => {
    console.log(`Worker ${workerInfo.workerIndex} started.`);
    await use();
    console.log(`Worker ${workerInfo.workerIndex} finished.`);
  }, { scope: 'worker', auto: true }],
});
Create a another-test.spec.ts file:
import { test, expect } from './global-setup-teardown';
test('Test in worker', async ({ page }) => {
  await page.goto('https://www.devsamurai.com/');
  await expect(page).toHaveScreenshot();
});
Explanation: logWorkerInfo is an automatic fixture with worker scope, running once when the worker starts and ends.
API Testing
1. Introduction
With Playwright, you can interact with your application's REST API. Instead of always testing through the web browser, you can send direct requests to the server using Node.js.
This is helpful for:
- Verifying that your API works as expected.
- Get the server ready before you test the web interface.
- Ensuring the server's data is correct after browser actions.
Playwright's APIRequestContext feature makes this possible within your tests.
2. What you will learn
In this Playwright tutorial, you’ll learn how to:
- Set up Playwright for API testing.
- Configure authentication with a token (e.g., GitHub).
- Write basic API tests (e.g., create issues on GitHub).
- Set up and clean up data before/after tests.
- (Optional) Combine API and UI testing.
3. Example
3.1. Environment Setup
a. Project Structure
my-project/
│
├── tests/
│   └── API/
│       ├── api-fixtures.ts        # 🔧 Custom API fixture definitions
│       └── api-testing.spec.ts    # ✅ Test file using the fixtures
│
├── .env                           # 🔐 Stores GitHub API_TOKEN
└── playwright.config.ts           # ⚙️ Playwright global configuration

b. Configuration
.env
API_TOKEN=ghp_XXXXXXXXXXXXXXXXXXXXXXX
playwright.config.ts
import { defineConfig } from '@playwright/test';
export default defineConfig({
  use: {
    // All requests we send go to this API endpoint.
    baseURL: 'https://api.github.com',
    extraHTTPHeaders: {
      // We set this header per GitHub guidelines.
      'Accept': 'application/vnd.github.v3+json',
      // Add authorization token to all requests.
      // Assuming personal access token available in the environment.
      'Authorization': `token ${process.env.API_TOKEN}`,
    },
  }
});
c. Proxy (optional)
If behind a proxy:
import { defineConfig } from '@playwright/test';
export default defineConfig({
  use: {
    proxy: {
      server: 'http://my-proxy:8080',
      username: 'user',
      password: 'secret'
    },
  }
});
3.2. Fixture definition
In tests/API/api-fixtures.tsfile
import { test as base, expect, APIRequestContext } from '@playwright/test';
import dotenv from 'dotenv';
dotenv.config();
const REPO = 'test-repo';
const USER = 'your-github-username'; // Replace with your GitHub username
type MyFixtures = {
  apiContext: APIRequestContext;
  repoName: string;
  githubUser: string;
};
export const test = base.extend<MyFixtures>({
  apiContext: async ({ playwright }, use) => {
    const context = await playwright.request.newContext({
      baseURL: 'https://api.github.com',
      extraHTTPHeaders: {
        'Authorization': `token ${process.env.API_TOKEN}`,
        'Accept': 'application/vnd.github+json',
      },
    });
    await use(context);
    await context.dispose();
  },
  repoName: async ({ apiContext }, use) => {
    const res = await apiContext.post('/user/repos', {
      data: { name: REPO },
    });
    expect(res.ok()).toBeTruthy();
    await use(REPO);
    const del = await apiContext.delete(`/repos/${USER}/${REPO}`);
    expect(del.ok()).toBeTruthy();
  },
  githubUser: async (_, use) => {
    await use(USER);
  },
});
export { expect };
3.3. Test file using fixtures
In tests/api-testing.spec.tsfile
import { test, expect } from './api-fixtures';
test('create a bug issue via API', async ({ apiContext, githubUser, repoName }) => {
  const res = await apiContext.post(`/repos/${githubUser}/${repoName}/issues`, {
    data: {
      title: 'Bug issue',
      body: 'Something is broken',
    },
  });
  expect(res.ok()).toBeTruthy();
});
test('issue appears in UI after API create', async ({ apiContext, githubUser, repoName, page }) => {
  const issueTitle = 'New feature';
  const res = await apiContext.post(`/repos/${githubUser}/${repoName}/issues`, {
    data: { title: issueTitle },
  });
  expect(res.ok()).toBeTruthy();
  await page.goto(`https://github.com/${githubUser}/${repoName}/issues`);
  const firstIssue = page.locator('a[data-hovercard-type="issue"]').first();
  await expect(firstIssue).toHaveText(issueTitle);
});
3.4. How to run
- Set your GitHub token in .env
- Replace your-github-username in
api-fixtures.ts - Run your tests: npx playwright test tests/API/api-testing.spec.ts
Note:
Even though you're configuring baseURL and headers in api-fixtures.ts, it's still important to define them in playwright.config.ts because:
- playwright.config.ts applies globally to all tests and the built-in request fixture.
- In
api-fixtures.ts, you're creating a custom request context, which overrides the global config for that specific fixture. - Use
playwright.config.tsfor common setup, and fixture config when you need custom behavior or isolation (e.g. cleanup or custom headers).
Advanced features
1. Playwright tutorial: File uploads
File uploads are common in web applications—think profile pictures, documents, or spreadsheets. Playwright makes it easy to test these workflows.
Example:
import { test, expect } from '@playwright/test';
test('upload a profile picture', async ({ page }) => {
  await page.goto('https://your-app.com/profile');
  // Select the file input and set the file
  const fileChooserPromise = page.waitForEvent('filechooser');
  await page.click('button#upload-avatar'); // Triggers the file input
  const fileChooser = await fileChooserPromise;
  await fileChooser.setFiles('tests/assets/avatar.png');
  // Submit the form and verify the upload
  await page.click('button#submit');
  await expect(page.locator('img.profile-pic')).toHaveAttribute('src', /avatar\.png/);
});
2. Parallel execution
By default, Playwright runs your tests across all three major browsers—Chromium, Firefox, and WebKit—using three parallel workers to speed up execution.
To further optimize performance, Playwright supports parallel test execution across browsers, workers, and browser contexts. This is especially helpful for large test suites.
You can fine-tune these settings in the playwright.config file to match your project's specific needs.
Enable Parallelism in playwright.config.ts:
import { defineConfig } from '@playwright/test';
export default defineConfig({
  workers: 4, // Adjust based on CPU cores
  use: {
    headless: true,
  },
});
You can also define multiple projects to run across different browsers:
3. CI/CD integration
Running Playwright in your CI pipelines ensures your app works with every commit and deployment.
Popular CI tools:
- GitHub Actions
- GitLab CI
- CircleCI
- Jenkins
Example: GitHub Actions CI config:
# .github/workflows/playwright.yml
name: Playwright Tests
on: [push, pull_request]
jobs:
  test:
    runs-on: ubuntu-latest
    steps:
      - uses: actions/checkout@v3
      - name: Setup Node.js
        uses: actions/setup-node@v3
        with:
          node-version: 18
      - run: npm install
      - run: npx playwright install --with-deps
      - run: npx playwright test
Conclusion: Go forth and test!
You've stepped into the vast universe of Playwright! From setup and writing your first tests to mastering locators and diving into the powerful Trace Viewer, you've built a solid foundation in modern web automation.
Playwright isn’t just a tool—it’s a reliable ally, offering speed, stability, and solutions to the pain points of older frameworks. It makes testing today’s complex, interactive apps easier and more enjoyable.
Now it’s your turn to shine. Create, explore, and push the limits with custom scripts. Use Codegen to uncover hidden paths, and let Trace Viewer help you quickly solve any issues.
This is just the beginning. Keep learning, stay curious, and enjoy the journey toward becoming a true Playwright expert.
Happy testing!